
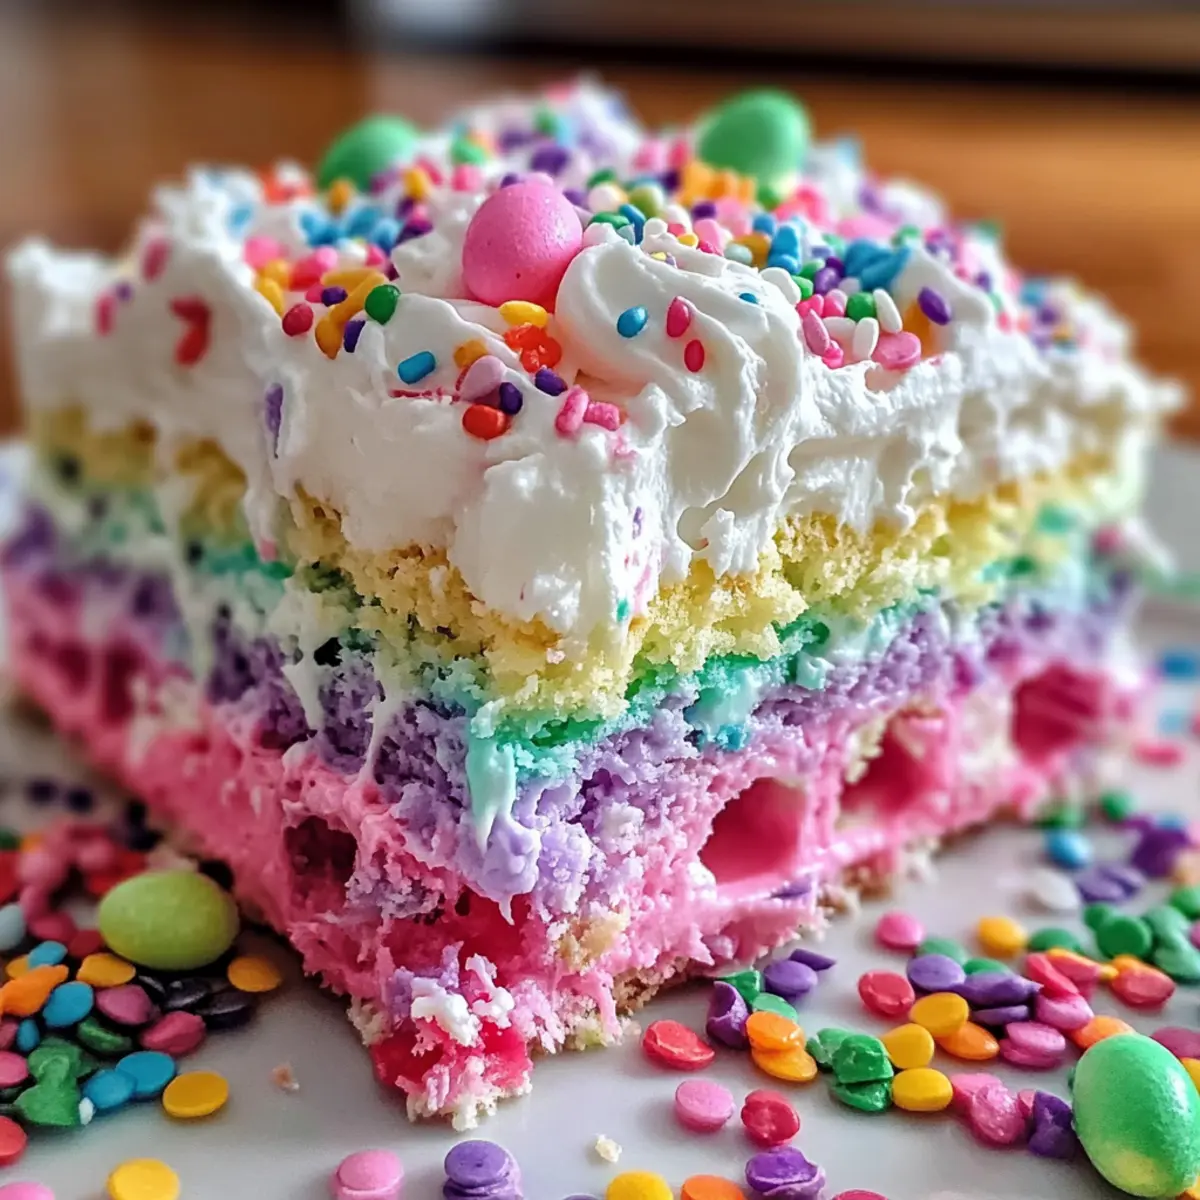
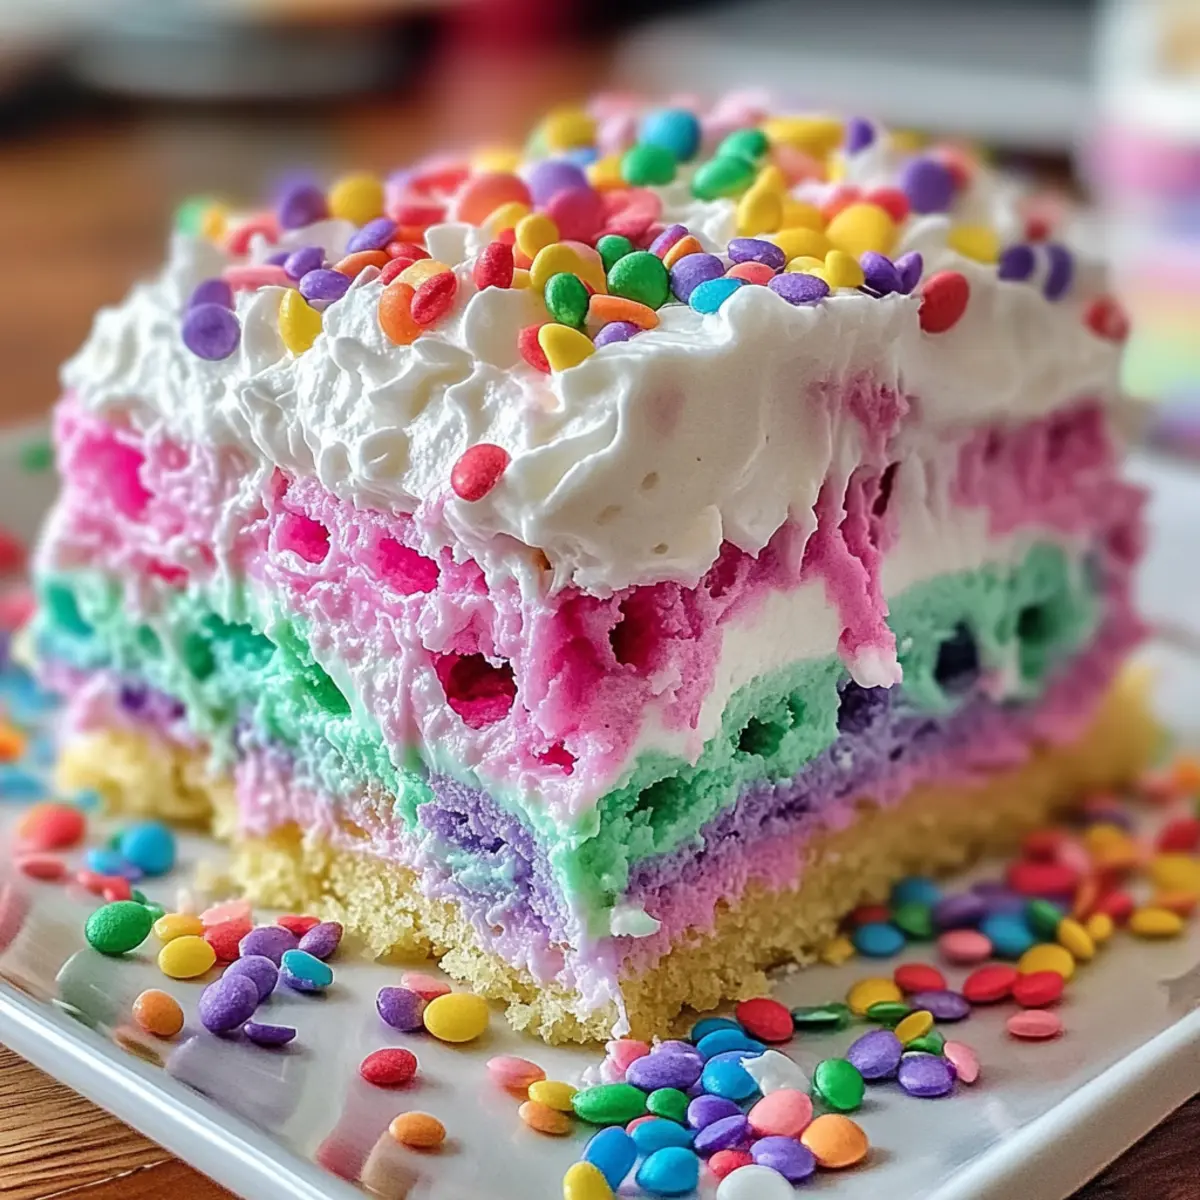
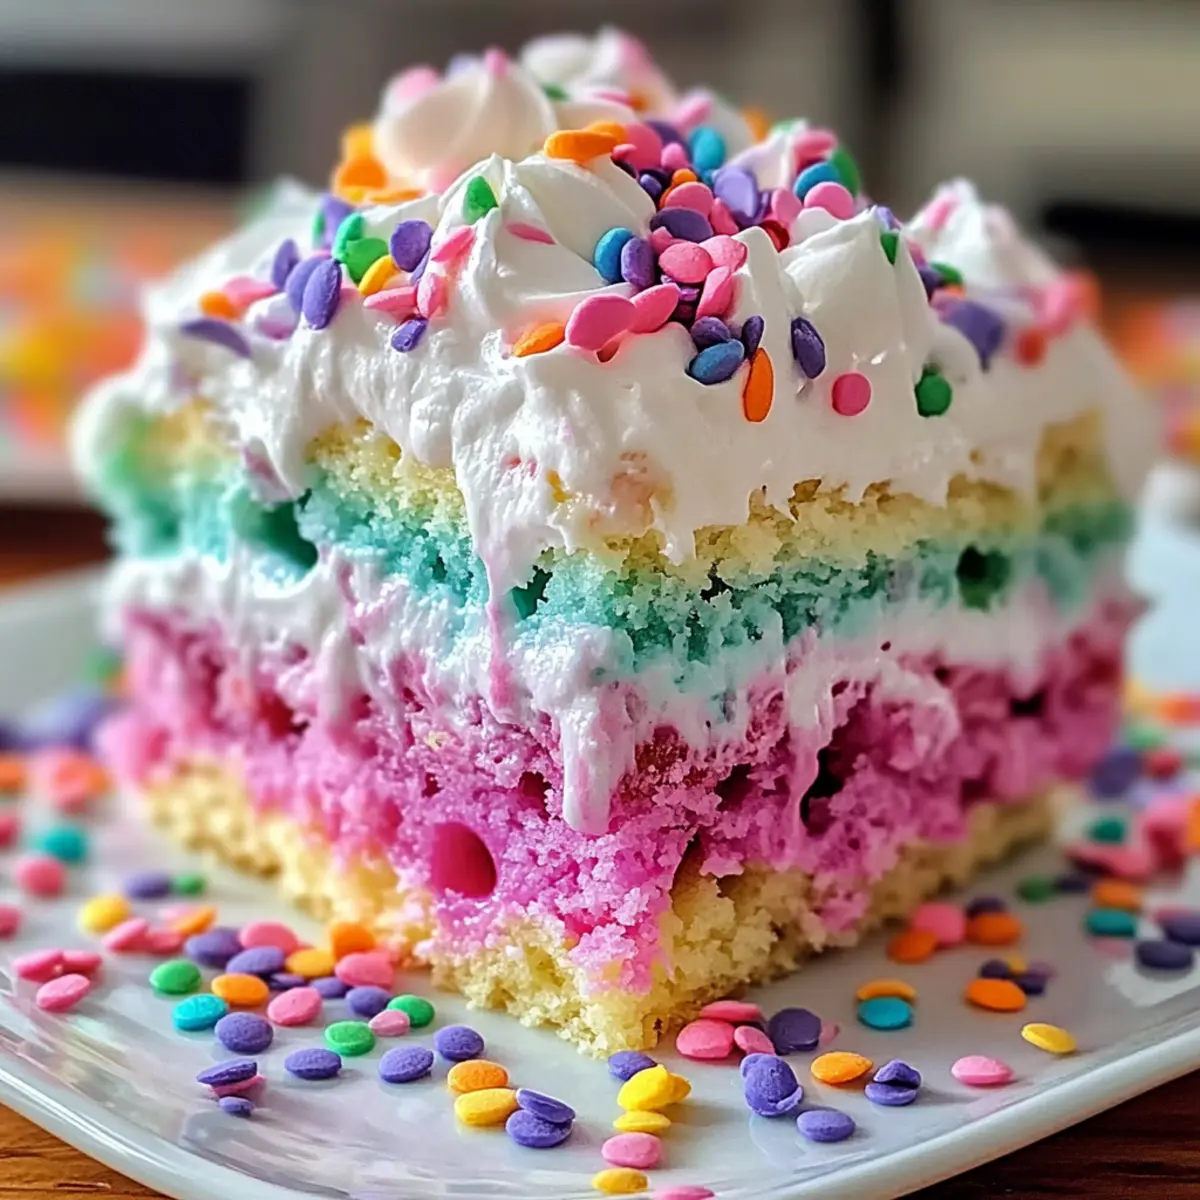
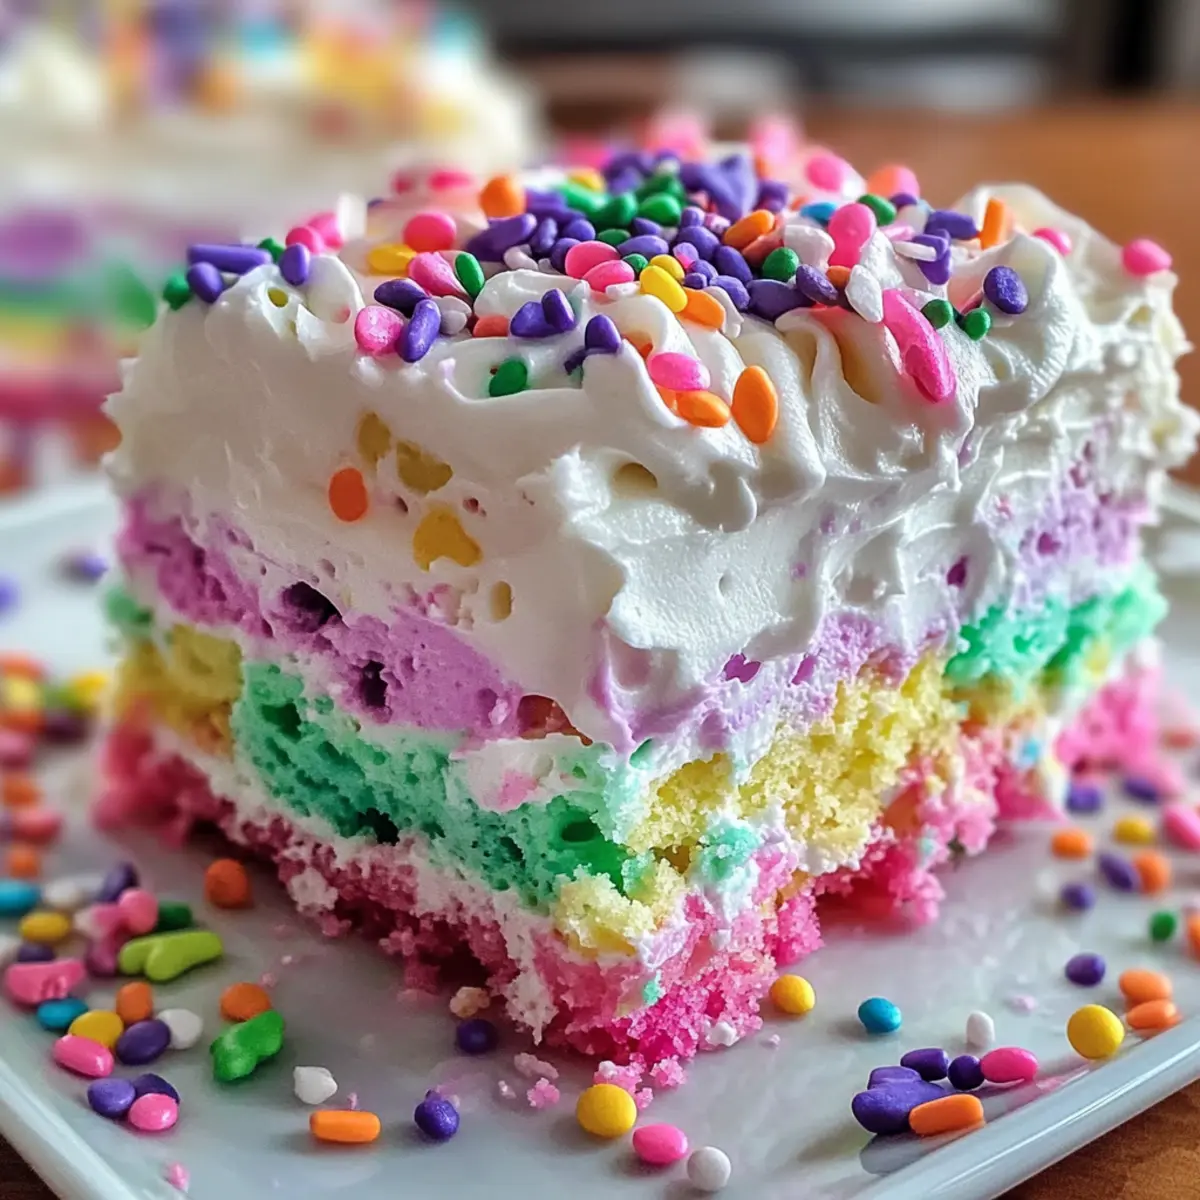
As I gazed at the colorful array of pastel colors swirling together in my mixing bowl, a wave of nostalgia washed over me. This Easy and Colorful Easter Poke Cake embodies the spirit of spring celebrations perfectly, inviting joyful gatherings filled with laughter and sweetness. Who wouldn’t want to impress their friends and family with a dessert that’s not only easy to whip up but also delightful to behold? The combination of moist cake and creamy vanilla pudding topped with fluffy Cool Whip is a kid-friendly hit sure to please even the pickiest eaters. And let’s not forget the fun of customizing it with vibrant gel food coloring and your choice of pudding flavors like zesty lemon or nutty pistachio! Are you ready to create a showstopper dessert that will leave everyone asking for seconds?
Why Is This Easter Cake a Must-Make?
Bright, Festive Appeal: The stunning pastel colors will brighten any spring gathering, instantly uplifting moods.
Kid-Friendly Fun: A perfect activity for children, involving them in the colorful mixing and decorating process.
Flavor Versatility: You can easily swap vanilla pudding for lemon or pistachio, allowing for endless creativity in flavor.
Quick and Simple: Utilizing a boxed cake mix makes preparation a breeze, leaving you more time to enjoy with loved ones.
Impressive Presentation: This cake not only tastes amazing but also looks stunning—perfect for impressing guests at any gathering. If you’re looking for another delightful dessert to try, check out my Oreo Poke Cake or the cozy Pumpkin Cake.
Easter Poke Cake Ingredients
• Get ready to create magic!
For the Cake
- Boxed White Cake Mix – It serves as the foundation for your Easter Poke Cake, offering a light and fluffy texture.
- Eggs – Essential for binding and moisture; follow the instructions on your cake mix box.
- Oil – Adds richness and helps keep your cake moist.
- Water – Required for combining with the cake mix; refer to package instructions for measurements.
- Gel Food Coloring – Bring your cake to life with vibrant pastel hues—think soft pink, mint green, baby blue, or lavender.
For the Pudding Layer
- Instant Vanilla Pudding Mix – This is key for creating a luscious, creamy layer that enhances the cake’s flavor. You can swap it for lemon or pistachio pudding for a creative twist!
- Cold Milk – Needed to prepare the pudding, ensuring it’s smooth and creamy.
For the Topping
- Cool Whip – A fluffy topping that adds a sweet finish; feel free to tint it with food dye for extra fun!
- Easter Sprinkles or Candy – Perfect for festive decoration, they’ll make your dessert irresistible and eye-catching.
Step‑by‑Step Instructions for Easter Poke Cake
Step 1: Preheat and Prepare
Begin by preheating your oven to 350°F (or as directed on your cake mix box). Grease a 9×13-inch baking dish using cooking spray or softened butter to prevent sticking. This crucial step ensures that your Easter Poke Cake releases easily from the pan and maintains its lovely shape, setting the foundation for a delightful dessert.
Step 2: Mix the Cake Batter
In a large mixing bowl, prepare the boxed white cake mix according to the package instructions, incorporating eggs, oil, and water. Use a hand mixer on medium speed for about 2 minutes until the batter is smooth and well-combined. This process infuses air into the mixture, ensuring a light and fluffy texture for your Easter Poke Cake.
Step 3: Color the Batter
Once your cake batter is mixed, divide it evenly into three or four separate bowls. Add a few drops of gel food coloring to each bowl, choosing spring-inspired colors like soft pink, mint green, or baby blue. Gently fold the colors into the batter until you reach your desired brightness; the vibrant hues will create a beautiful, marbled effect in the finished cake.
Step 4: Layer the Colors
Spoon the colored batters into the greased pan, alternating the colors to create a fun and festive pattern. Use a butter knife or skewer to gently swirl the batter together, achieving a marbled effect without overmixing. Visualize a lovely swirl as you create this Easter Poke Cake masterpiece that will catch everyone’s eye.
Step 5: Bake and Cool
Place the pan in the preheated oven and bake for 28-32 minutes. To check for doneness, insert a toothpick into the center of the cake; it should come out clean. Once baked, allow the cake to cool in the pan for 15-20 minutes, letting it set before moving on to the next step.
Step 6: Poke Holes
After the cake has cooled slightly, use the handle of a wooden spoon to poke holes every inch throughout the cake. This step is essential for the pudding to seep in, adding a creamy texture and flavor that defines the Easter Poke Cake. Make sure to poke deep enough to allow the pudding to penetrate.
Step 7: Prepare the Pudding
In a separate bowl, whisk together the instant vanilla pudding mix and cold milk according to the package instructions. Mix until slightly thickened, about 2-3 minutes. Pour the pudding mixture evenly over the poked sections of the cake, ensuring it seeps into all the holes. This step provides that delicious, creamy layer your Easter Poke Cake needs.
Step 8: Chill for Flavor
Cover the cake with plastic wrap and refrigerate for at least 2 hours, or overnight for best results. This chilling time allows the flavors to meld beautifully and ensures the pudding sets properly, making your Easter Poke Cake even more delightful and festive.
Step 9: Top with Cool Whip
Once chilled, remove the cake from the fridge and spread a generous layer of Cool Whip over the top. For added fun, consider tinting the Cool Whip with a bit of food dye for a colorful finish. This fluffy topping creates a sweet, airy contrast to the moist cake filled with delicious pudding.
Step 10: Decorate and Serve
Finish your Easter Poke Cake by decorating it with sprinkles or festive candies to celebrate the holiday. Chill the cake again if desired until serving. When ready, slice into your vibrant creation, revealing the colorful layers and creamy filling, and enjoy a piece of springtime magic with family and friends!
Easter Poke Cake Variations & Substitutions
Feel free to make this festive dessert your own with several fun and tasty twists!
- Lemon Pudding: Substitute vanilla pudding with lemon for a refreshing, tangy flavor that brightens up your Easter cake!
- Pistachio Pudding: Swap in pistachio pudding for a nutty kick that pairs wonderfully with the airy texture of the cake.
- Alternate Colors: Experiment with vibrant gel food colorings to give your cake a unique pastel palette, creating cheerful swirls!
- Fruit Toppings: Top with fresh fruits like strawberries or blueberries for a burst of freshness, enhancing both flavor and presentation.
- Nutty Crunch: Incorporate chopped nuts, like walnuts or almonds, into the Cool Whip topping for a delightful crunch, adding texture to every bite.
- Spicy Upgrade: For a hint of warmth, mix in a dash of cinnamon to the Cool Whip or pudding for a subtle spiced flavor that complements the sweetness.
- Candy Explosion: Load your cake with your favorite Easter candies, like jelly beans or chocolate eggs, for a fun, whimsical touch!
- Chocolate Drizzle: Finish with a drizzle of chocolate sauce over the Cool Whip for an indulgent twist, perfect for chocolate lovers!
Don’t forget, another delightful dessert option for your gatherings is my Chocolate Tuxedo Cake, sure to impress just as much as this vibrant Easter Poke Cake!
Expert Tips for Easter Poke Cake
-
Coloring Caution: Use gel food coloring instead of liquid food coloring for more vibrant and true pastel shades without altering your cake’s texture.
-
Poke with Care: Ensure your cake has cooled adequately before poking holes. Poking too soon can lead to a crumbly cake that may fall apart.
-
Timing is Key: Work swiftly when preparing the pudding layer, as it thickens quickly. This ensures that the pudding seeps properly into your Easter Poke Cake for maximum flavor.
-
Decorative Touches: Consider using piping bags and various tips to create beautiful designs with Cool Whip, adding an artistic finish to your cake that elevates it even further.
-
Flavor Variations: Don’t hesitate to experiment with different pudding flavors, like lemon or pistachio, to create unique twists on this traditional Easter Poke Cake.
What to Serve with Easter Poke Cake
Nothing completes the joy of this vibrant dessert quite like thoughtful pairings that elevate your spring gathering.
- Fresh Berries: A mix of strawberries, blueberries, and raspberries adds a tangy contrast that enhances the sweetness of the cake.
- Whipped Cream: A side of homemade whipped cream provides an extra creamy element that complements the cake’s fluffy texture.
- Light Fruit Salad: Combining seasonal fruits offers a refreshing crunch that balances the richness of the pudding-filled cake.
- Vanilla Ice Cream: A scoop of creamy vanilla ice cream brings a delightful temperature contrast and enhances the cake’s flavors with its creaminess.
- Lemonade or Iced Tea: A chilled glass of lemonade or iced tea adds a refreshing, zesty note, perfectly quenching thirst during festive gatherings.
- Chocolate Drizzle: A light drizzle of chocolate sauce can lend a decadent touch, allowing for indulgence with each slice. Its rich flavor plays wonderfully against the vibrant cake.
With these pairings, you’re all set for a delightful spring celebration that’s as joyous to share as it is to create!
How to Store and Freeze Easter Poke Cake
Fridge: Store leftover Easter Poke Cake in an airtight container to maintain its freshness. It will keep well in the refrigerator for up to 3 days.
Freezer: For long-term storage, slice the cake and wrap individual pieces tightly in plastic wrap before placing them in a freezer bag. It can be frozen for up to 2 months.
Thawing: When ready to eat, thaw individual slices in the refrigerator overnight for optimal texture and flavor. Enjoy the creamy goodness just like when it was freshly made!
Reheating: If desired, reheat individual pieces in the microwave for 10-15 seconds to slightly warm it up, enhancing the overall experience of the Easter Poke Cake.
Make Ahead Options
This Easter Poke Cake is ideal for make ahead preparations, allowing you to save time and enjoy your celebration stress-free. You can bake the cake and cool it, then poke holes in it up to 24 hours in advance. Once that’s done, prepare the instant vanilla pudding and pour it over the cooled cake, letting it settle. Refrigerate the cake for at least 2 hours, or store it overnight to let the flavors meld. For the best quality, wait to add the Cool Whip and toppings until just before serving, ensuring that it remains fluffy and vibrant. With these prep tips, your Easter Poke Cake will be just as delicious and festive when it’s time to serve!
Easter Poke Cake Recipe FAQs
What type of gel food coloring works best for this cake?
I recommend using gel food coloring over liquid food coloring for creating vibrant pastel shades. Gel colors provide more intense hues without altering the moisture and texture of your Easter Poke Cake.
How should I store leftovers?
To keep your cake fresh, store leftover Easter Poke Cake in an airtight container in the refrigerator. It should stay delightful for up to 3 days, maintaining its moisture and creaminess.
Can I freeze Easter Poke Cake, and how?
Absolutely! To freeze your Easter Poke Cake, first slice it into individual portions. Wrap each slice tightly in plastic wrap and place them in a freezer bag. It can be frozen for up to 2 months. When you’re ready to enjoy it, thaw in the refrigerator overnight for the best taste and texture.
What if my pudding doesn’t thicken properly?
If you find that your pudding isn’t thickening as expected, it might be due to not whisking long enough or using warm milk. Make sure to whisk for at least 2-3 minutes until the mixture starts to thicken. Also, follow the package instructions carefully for best results; sometimes, letting it sit can help if it seems runny at first.
Is this cake suitable for those with nut allergies?
Yes, this Easter Poke Cake is generally nut-free as it uses a boxed cake mix and standard pudding. However, always double-check the packaging to ensure there are no hidden nut ingredients or cross-contamination warnings for each product you use!
Colorful Easter Poke Cake That Will Brighten Your Spring
Ingredients
Equipment
Method
- Preheat your oven to 350°F (or as directed on your cake mix box). Grease a 9x13-inch baking dish.
- Prepare the boxed cake mix according to package instructions, incorporating eggs, oil, and water. Mix until smooth.
- Divide the batter into three or four bowls. Add gel food coloring to each bowl and gently fold until combined.
- Spoon the colored batters into the greased pan in alternating layers, then swirl with a knife for a marbled effect.
- Bake for 28-32 minutes. Let the cake cool in the pan for 15-20 minutes before serving.
- Poke holes with a wooden spoon handle in the cooled cake to allow pudding to seep in.
- Whisk together the instant pudding mix and cold milk. Pour over the poked cake to fill the holes.
- Cover with plastic wrap and refrigerate for at least 2 hours, or overnight for best results.
- Spread a layer of Cool Whip on top and decorate with sprinkles or candies.
- Slice and serve the cake to enjoy a vibrant spring dessert!
Leave a Reply