
Late one summer evening, as friends gathered for a movie night, I decided it was time to showcase a healthier dessert that still delivered on nostalgia: Healthy Peanut Butter Buster Bars. These delightful treats are a frozen twist on a beloved Dairy Queen classic, combining creamy peanut butter yogurt with a rich chocolate shell. And the best part? You can whip them up in just 5 minutes! With only around 200 calories and a whopping 15 grams of protein per bar, they’re not just guilt-free but also perfect for anyone craving something sweet without straying from their health goals. Plus, they’re easily customizable to fit various dietary needs. Are you ready to impress your guests and treat yourself to something delicious? Let’s dive into this simple, yet satisfying recipe!
Why are these Buster Bars irresistible?
Simplicity at its finest: With just a handful of ingredients, you can create these mouthwatering bars in under 5 minutes.
Guilt-free indulgence: Each bar boasts about 200 calories and 15 grams of protein, so you can satisfy your sweet tooth without compromising your diet.
Customizable delights: Easily swap out yogurt types or nut butters to cater to your own dietary preferences, whether it’s vegan, keto, or dairy-free. Try adding berries for a fruity twist or even incorporate protein powder for an extra boost.
Nostalgic flavor: These bars are reminiscent of the classic Dairy Queen dessert, capturing that rich, creamy essence you know and love. Perfect not just for movie nights or summer gatherings, they appeal to everyone—from health enthusiasts to dessert lovers alike!
Make-ahead magic: Store them in the freezer for a quick and satisfying snack that’s ready when you are. Enjoy them anytime, whether as a post-workout treat or a sweet ending to a family meal.
Buster Bars Ingredients
For the Base
• Yogurt – This is the foundational ingredient; use regular or Greek yogurt, vanilla ice cream, or vegan yogurt for a dairy-free treat.
• Peanut Butter – Adds a rich, creamy flavor; feel free to substitute with almond butter, cashew butter, or sunflower seed butter for allergy concerns.
For Sweetness
• Sweetener – Optional for unsweetened yogurt; regular sugar, maple syrup, honey, or stevia work well. Adjust based on how sweet your yogurt is.
For the Coating
• Chocolate Chips – These create a delicious outer shell; for vegan bars, choose dairy-free chocolate chips, or for keto, go with sugar-free chocolate chips.
• Coconut Oil – Mix this with melted chocolate for an ultra-smooth coating, but you can skip it for a quicker prep.
For Topping (optional)
• Peanuts – Chop them up for an added crunch and texture that complements the creamy Buster Bars.
Now, you have everything you need to create delicious Buster Bars that are not only healthy but also easy to make!
Step‑by‑Step Instructions for Healthy Peanut Butter Buster Bars
Step 1: Prepare the Base
In a mixing bowl, combine your choice of yogurt with peanut butter, stirring until the mixture is smooth and creamy. If using unsweetened yogurt, add your preferred sweetener to taste. Consider incorporating mini chocolate chips for an extra treat. This mixture will be the base of your Buster Bars, so mix well until fully combined.
Step 2: Shape the Bars
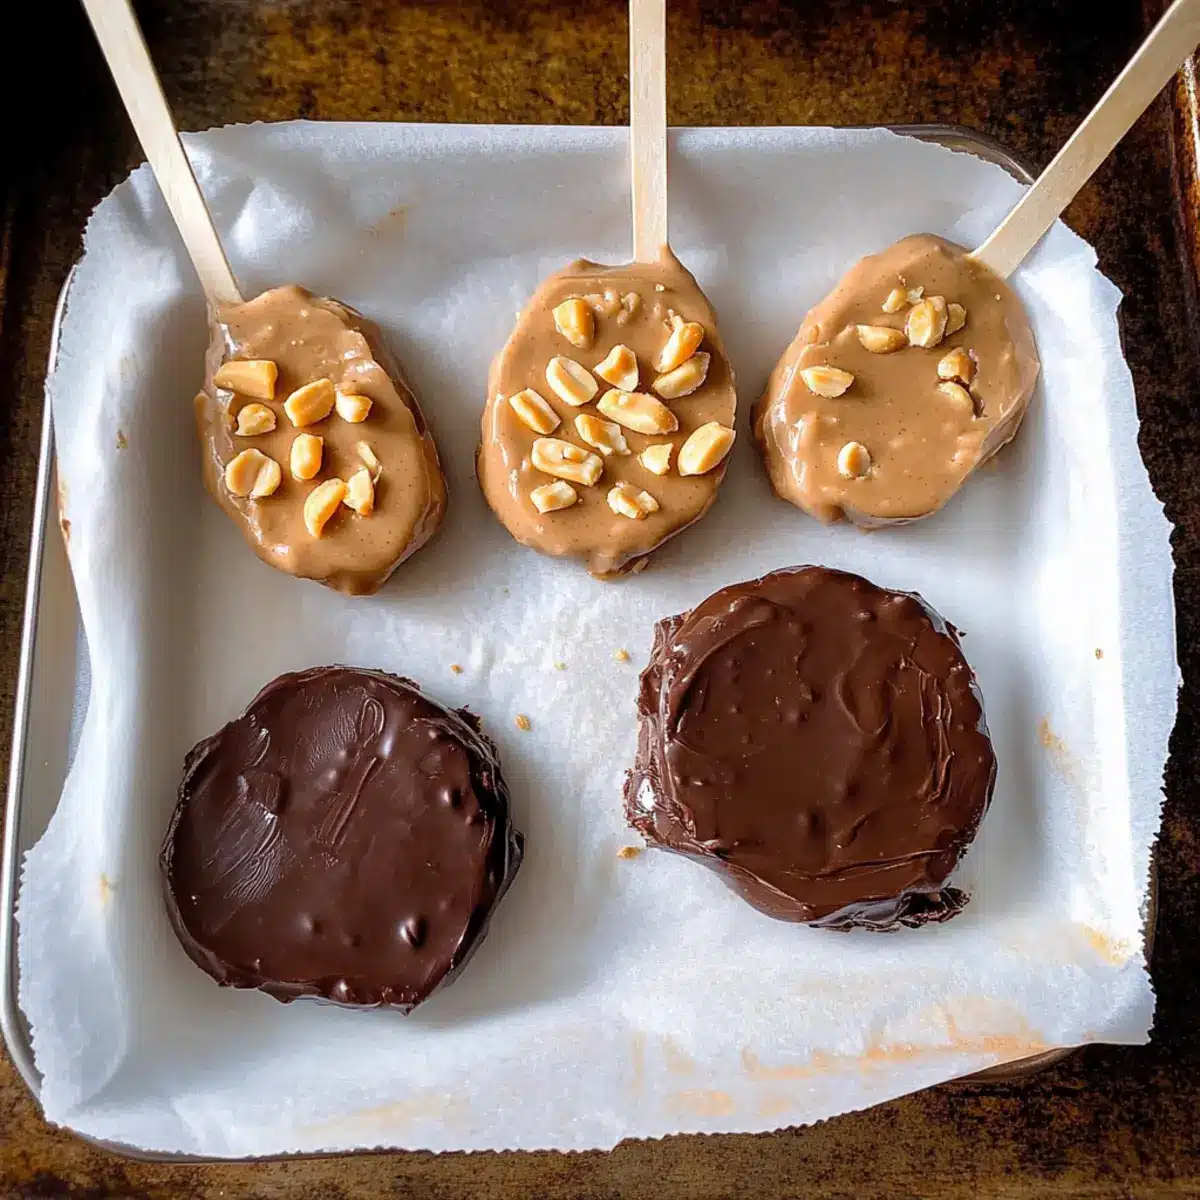
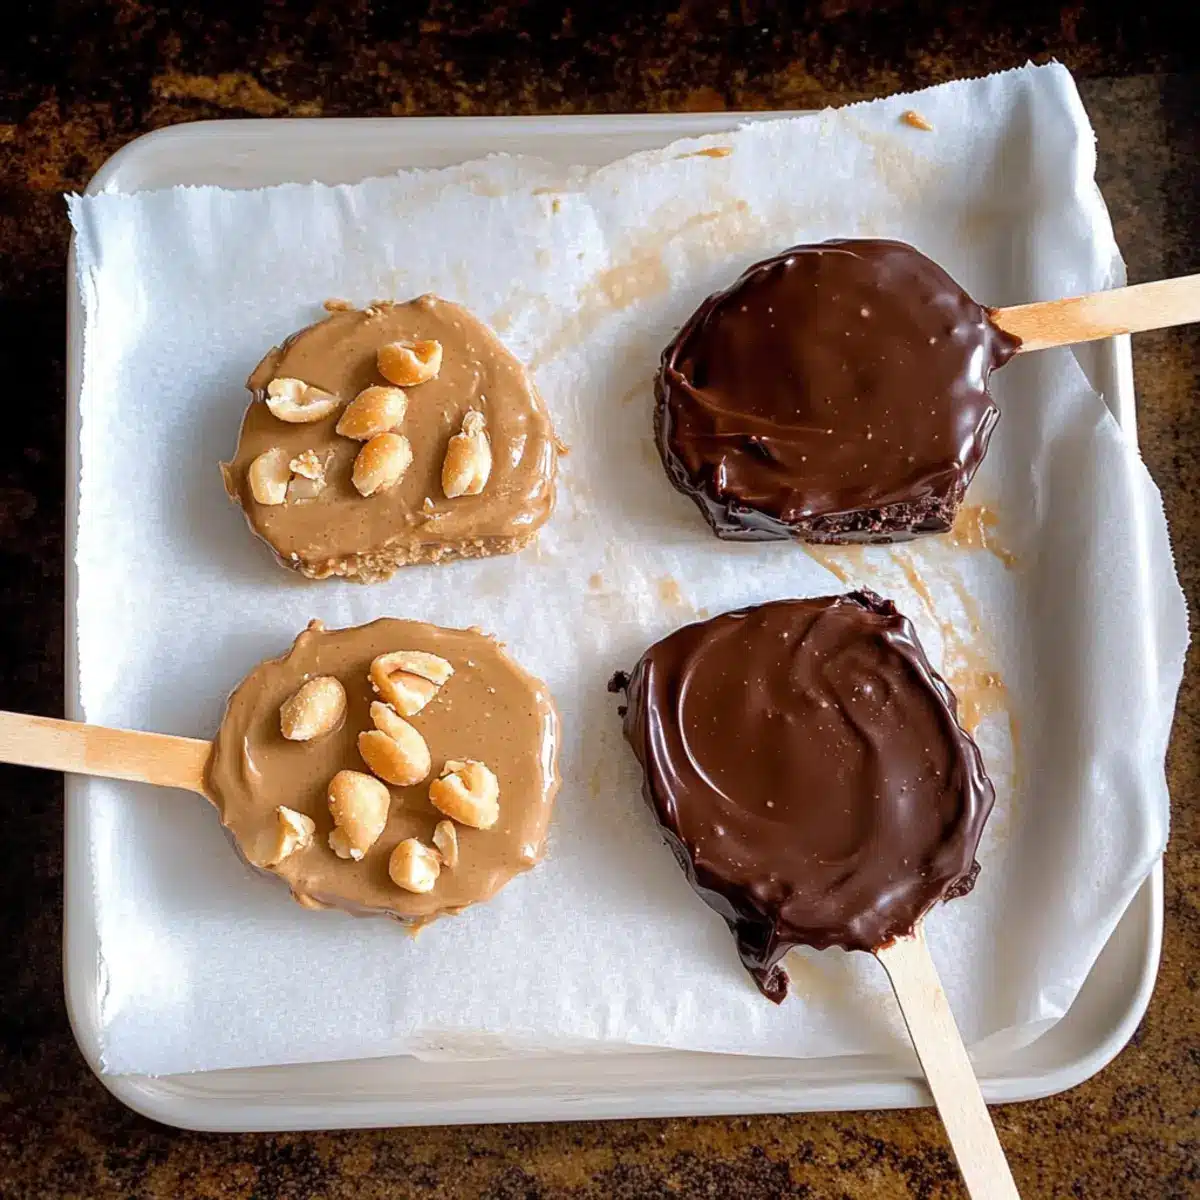
Line a baking sheet with parchment paper to prevent sticking. Using a spoon, drop dollops of the yogurt-peanut butter mixture onto the parchment, ensuring they are well-shaped. Insert a popsicle stick into each mound, which will serve as handles when enjoying your frozen treats. Aim for roughly equal sizes for even freezing.
Step 3: Smooth the Tops
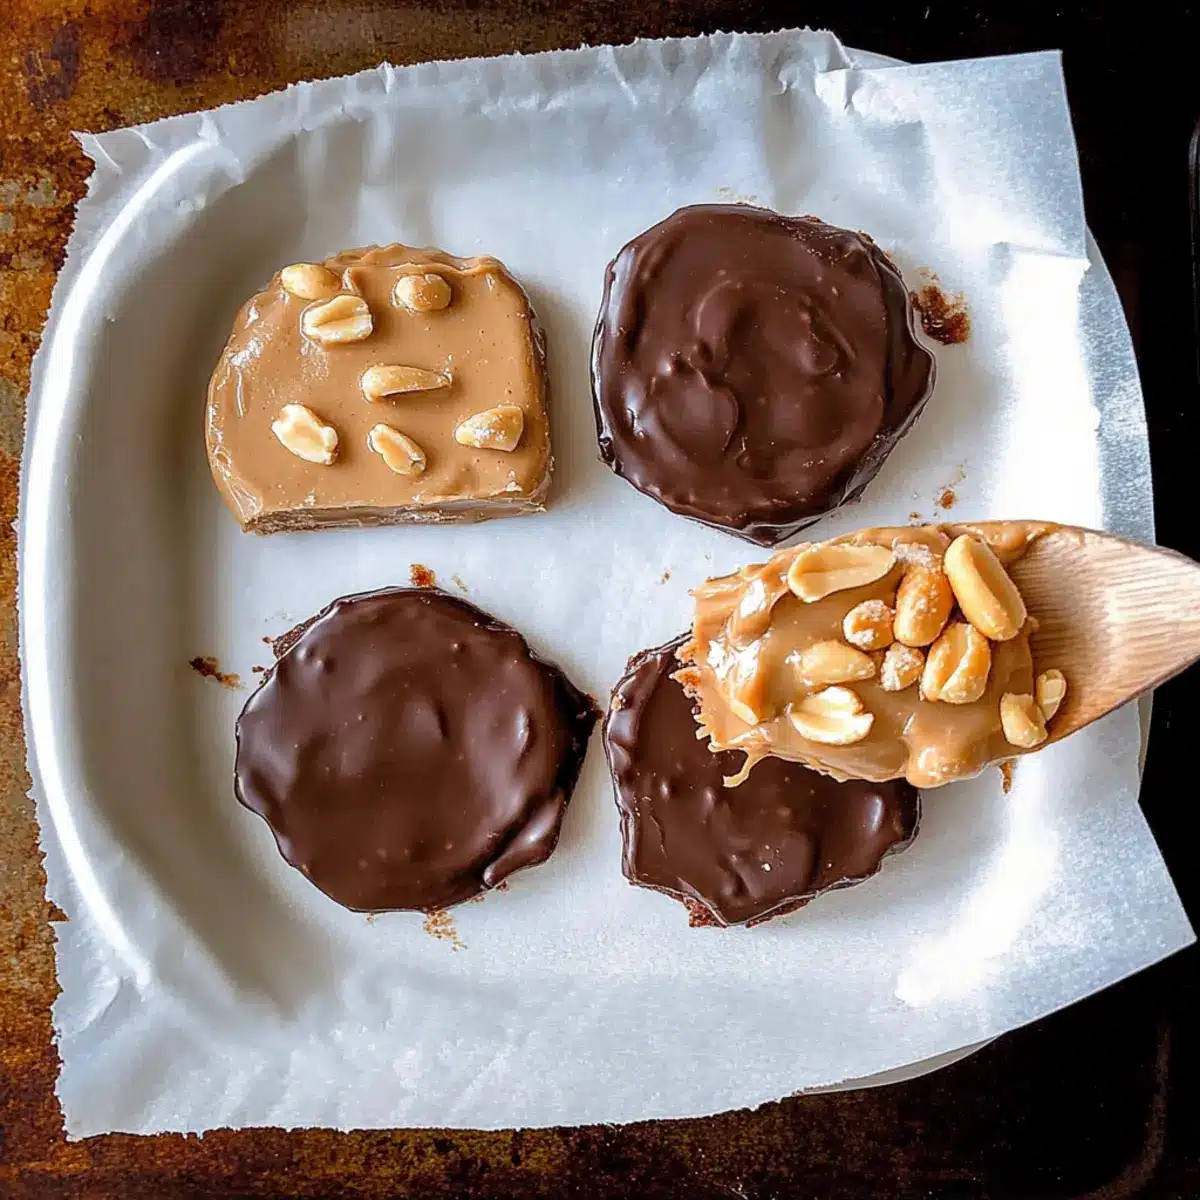
With a spatula, gently smooth down the tops of each dollop to create an even surface. If you’re adding extra texture, sprinkle chopped peanuts on top at this stage. This not only enhances the flavor but also gives your Buster Bars a delightful crunch. Make sure the toppings stick well to the mixture before moving to the next step.
Step 4: Freeze the Mixture
Place the baking sheet in the freezer and allow the Buster Bars to freeze for about 1 to 2 hours or until firm. This step is crucial for creating that lovely frozen texture. Keep an eye on your bars; you want them solid enough to dip without falling apart.
Step 5: Melt the Chocolate
While your bars are freezing, melt the chocolate chips in a microwave-safe bowl in 30-second intervals, stirring frequently until smooth. If desired, stir in a bit of coconut oil after melting for a silkier chocolate coating. Avoid overheating the chocolate to prevent a grainy texture—you’re aiming for a lovely, glossy finish.
Step 6: Coat the Bars
Once your Buster Bars are frozen solid, carefully dip each one into the melted chocolate, ensuring the bar is fully covered. Allow any excess chocolate to drip off before placing them back on the parchment-lined baking sheet. This chocolate shell will create a delicious contrast to the creamy base.
Step 7: Final Freezing
Return the chocolate-covered Buster Bars to the freezer for an additional 30 minutes or until the chocolate has set completely. During this time, make sure they freeze completely to maintain their structure. Check to ensure they are firm to the touch before taking them out for serving.
Step 8: Serve or Store
Your Healthy Peanut Butter Buster Bars are now ready to be enjoyed! You can serve them immediately for a delightful dessert experience, or store leftovers in an airtight container in the freezer for up to one month. Enjoy these guilt-free treats whenever the sweet craving strikes!
Make Ahead Options
These Healthy Peanut Butter Buster Bars are perfect for busy home cooks looking to save time! You can prepare the yogurt and peanut butter mixture up to 24 hours in advance; simply store it in an airtight container in the refrigerator. Once you’re ready to assemble, drop spoonfuls onto a parchment-lined tray, insert the popsicle sticks, and freeze for about 1-2 hours until firm. This ensures your bars are just as creamy and delicious. If you want to make them even further in advance, the fully assembled chocolate-coated Buster Bars can be stored in the freezer for up to one month. With this make-ahead strategy, you’ll have a delectable, guilt-free treat ready whenever you need a sweet indulgence!
Buster Bars Variations & Substitutions
Customize your Buster Bars to suit your taste preferences and dietary needs with these delightful swaps and twists!
-
Nut-Free: Replace peanut butter with sunflower seed butter for a deliciously creamy, nut-free alternative that everyone can enjoy.
-
Dairy-Free: Use coconut yogurt or any vegan yogurt to create a dairy-free version that’s just as creamy and satisfying.
-
Sweetener Swap: For a healthier option, try using agave syrup or monk fruit sweetener to sweeten your yogurt without added sugar.
-
Protein Boost: Mix in vanilla or chocolate protein powder to your yogurt for an extra protein punch, making these bars even more filling.
-
Fruity Twist: Blend in mashed bananas, pureed strawberries, or mixed berries into the base for a refreshing, fruity flavor that elevates each bite.
-
Crunch Factor: Toss in some granola or chopped nuts for added texture that complements the creamy interior beautifully.
-
Chocolate Variation: Experiment with dark chocolate for coating to enhance the richness and add a slightly bitter contrast to the sweetness.
For more delicious variations, check out these Pumpkin Smores Bars that put a fun spin on dessert treats! Enjoy your culinary creativity!
Expert Tips for Healthy Buster Bars
-
Yogurt Choice Matters: Use unsweetened Greek yogurt for a high-protein option. If using sweetened yogurt, adjust or omit additional sweeteners to avoid overpowering sweetness.
-
Mind the Chocolate: When melting chocolate, heat gradually and stir frequently to prevent it from becoming grainy. A smooth chocolate shell makes all the difference for your Buster Bars.
-
Freezing Tips: Ensure bars are fully frozen before dipping in chocolate to prevent them from falling apart. Proper freezing creates that perfect creamy center and sturdy coating.
-
Customizable Additions: Don’t hesitate to experiment! Add in fruits like strawberries or blueberries, or mix in a scoop of protein powder to enrich these healthy Buster Bars further.
-
Helpful Storage: Store leftover bars in an airtight container in the freezer. They keep well for up to a month, ensuring you always have a sweet treat on hand when the craving strikes.
How to Store and Freeze Buster Bars
Fridge: Store any leftovers in an airtight container in the fridge for up to 3 days. However, they are best enjoyed frozen for that delightful texture.
Freezer: For long-term storage, place Buster Bars in an airtight container or wrap them individually in plastic wrap before freezing. They can last up to one month.
Reheating: Simply let the bars sit at room temperature for a few minutes to soften before enjoying, or pop them in the microwave for a few seconds if preferred.
Serving: Enjoy directly from the freezer for a deliciously refreshing treat!
What to Serve with Healthy Peanut Butter Buster Bars?
Imagine a warm summer evening where laughter fills the air, and you have just the right sweet treats to elevate the moment.
- Fresh Berries: Juicy strawberries or blueberries add a refreshing pop and a burst of flavor that pairs beautifully with the creamy bars.
- Creamy Coconut Milk Ice Cream: This dairy-free option complements the Buster Bars’ creaminess, providing a tropical twist that will impress your guests.
- Roasted Nuts: Crunchy almonds or walnuts can offer a satisfying texture contrast, making each bite an exciting experience.
- Chocolate-Dipped Fruit: Consider serving fresh fruit dipped in chocolate sauce alongside your bars—it’s a delightful nod to indulgence and freshness!
- Homemade Granola: A crunchy granola mix as a side can enhance the snack appeal, and its nutty flavor pairs well with the peanut butter.
- Iced Coffee or Tea: A chilled beverage like iced coffee or herbal tea makes for a perfect companion, balancing the sweetness of the Buster Bars.
- Frozen Yogurt Sundaes: Turn your dessert into a grand finale by stacking pieces of Buster Bars on a bowl of frozen yogurt, topped with chocolate drizzle for extra sweetness.
Buster Bars Recipe FAQs
How do I choose the right yogurt for my Buster Bars?
Absolutely! For the best results, opt for unsweetened Greek yogurt for a rich and protein-packed base. If you prefer a dairy-free option, vegan yogurt works wonderfully too! Just make sure it has a similar consistency to regular yogurt for optimal texture in the bars.
How should I store my Buster Bars, and how long do they last?
To keep your Buster Bars fresh, store them in an airtight container in the freezer, where they can last up to one month. If you want them easily accessible, you can also wrap them individually in plastic wrap. They’re best enjoyed straight from the freezer for that delightful treat!
Can I freeze my Buster Bars? If so, what’s the best method?
Very! To freeze your Buster Bars, first ensure they are fully set in the freezing process. After you dip them in chocolate and they have set, place them in an airtight container, or wrap them individually in plastic wrap before freezing. This helps preserve their texture and flavor for up to one month!
What should I do if the chocolate coat on my Buster Bars is grainy?
If you find that your chocolate has a grainy texture, it might have been overheated. To remedy this, take your chocolate and stir in a small amount of fresh coconut oil. The oil will help smooth it out! Next time, heat the chocolate in shorter intervals of 20-30 seconds, stirring frequently to avoid overheating.
Are these Buster Bars safe for people with nut allergies?
Absolutely! You can easily customize this recipe to be nut-free. Simply replace the peanut butter with sunflower seed butter or a nut-free spread. Always check the labels for potential cross-contamination, and if you’re ever unsure, consult a healthcare professional.
Can I add protein powder to my Buster Bars?
Yes, indeed! For an extra protein boost, you can mix in a scoop of your favorite protein powder into the yogurt-peanut butter mixture. Mix well until fully blended for a creamy texture. This can help enhance the nutritional profile and is perfect for post-workout recovery!

Delicious Healthy Buster Bars for Guilt-Free Indulgence
Ingredients
Equipment
Method
- In a mixing bowl, combine yogurt and peanut butter until smooth. Add sweetener if using.
- Line a baking sheet with parchment paper. Drop dollops of the mixture onto the parchment and insert popsicle sticks.
- Smooth the tops of the dollops and sprinkle with chopped peanuts if desired.
- Freeze the bars for 1 to 2 hours until firm.
- Melt chocolate chips in a microwave-safe bowl in intervals until smooth. Optionally stir in coconut oil.
- Dip each frozen bar into the melted chocolate, ensuring full coverage.
- Return the chocolate-covered bars to the freezer for 30 minutes until chocolate is set.
- Serve immediately or store in an airtight container in the freezer for up to one month.
Leave a Reply