
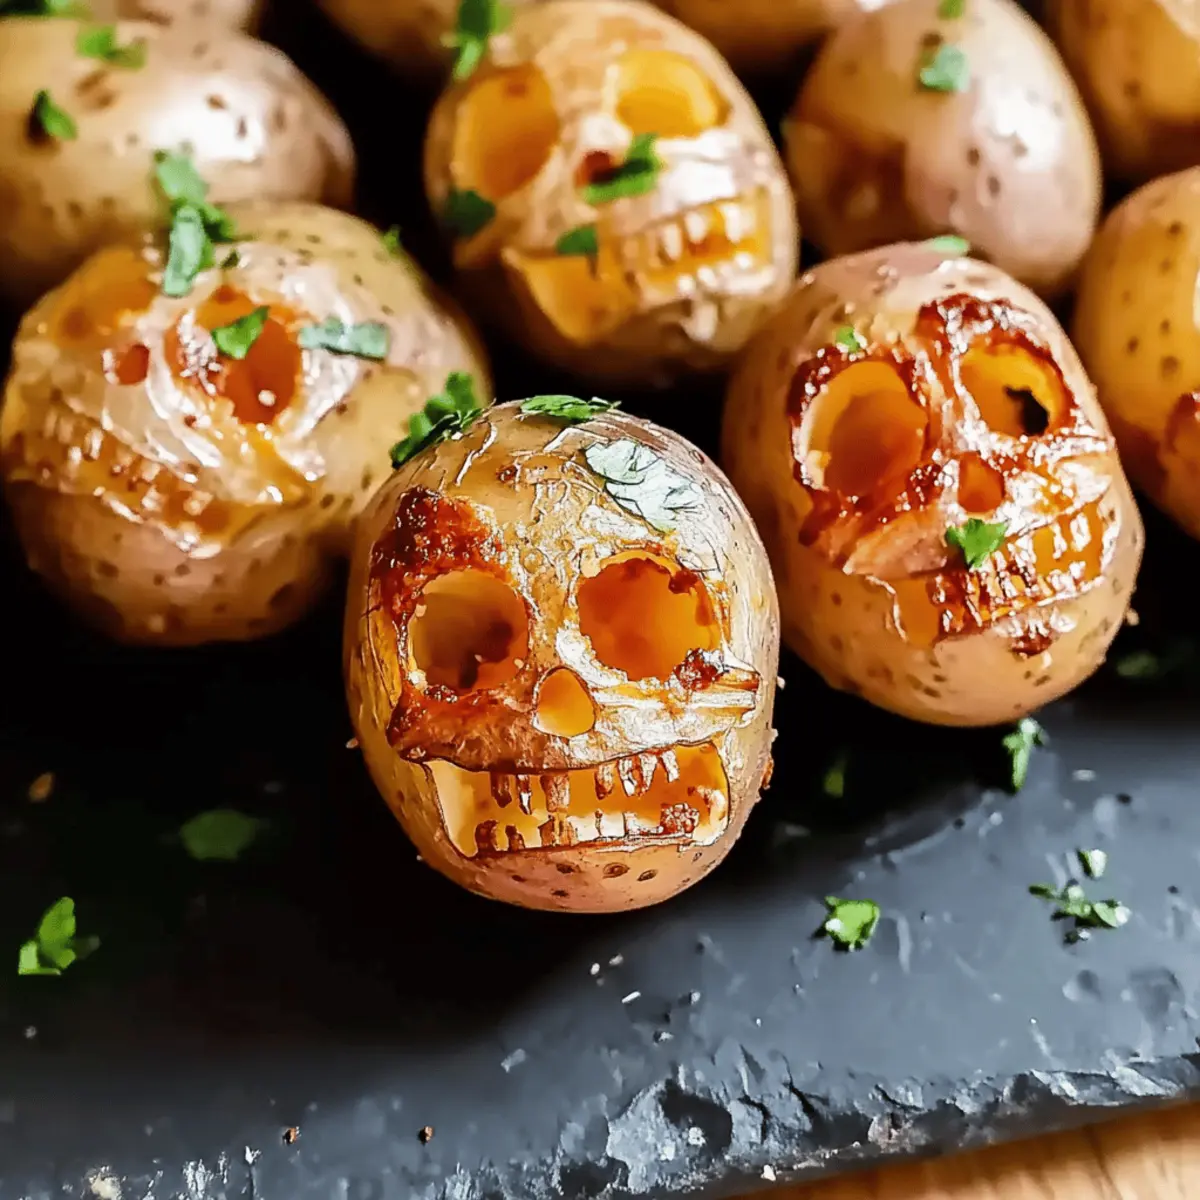
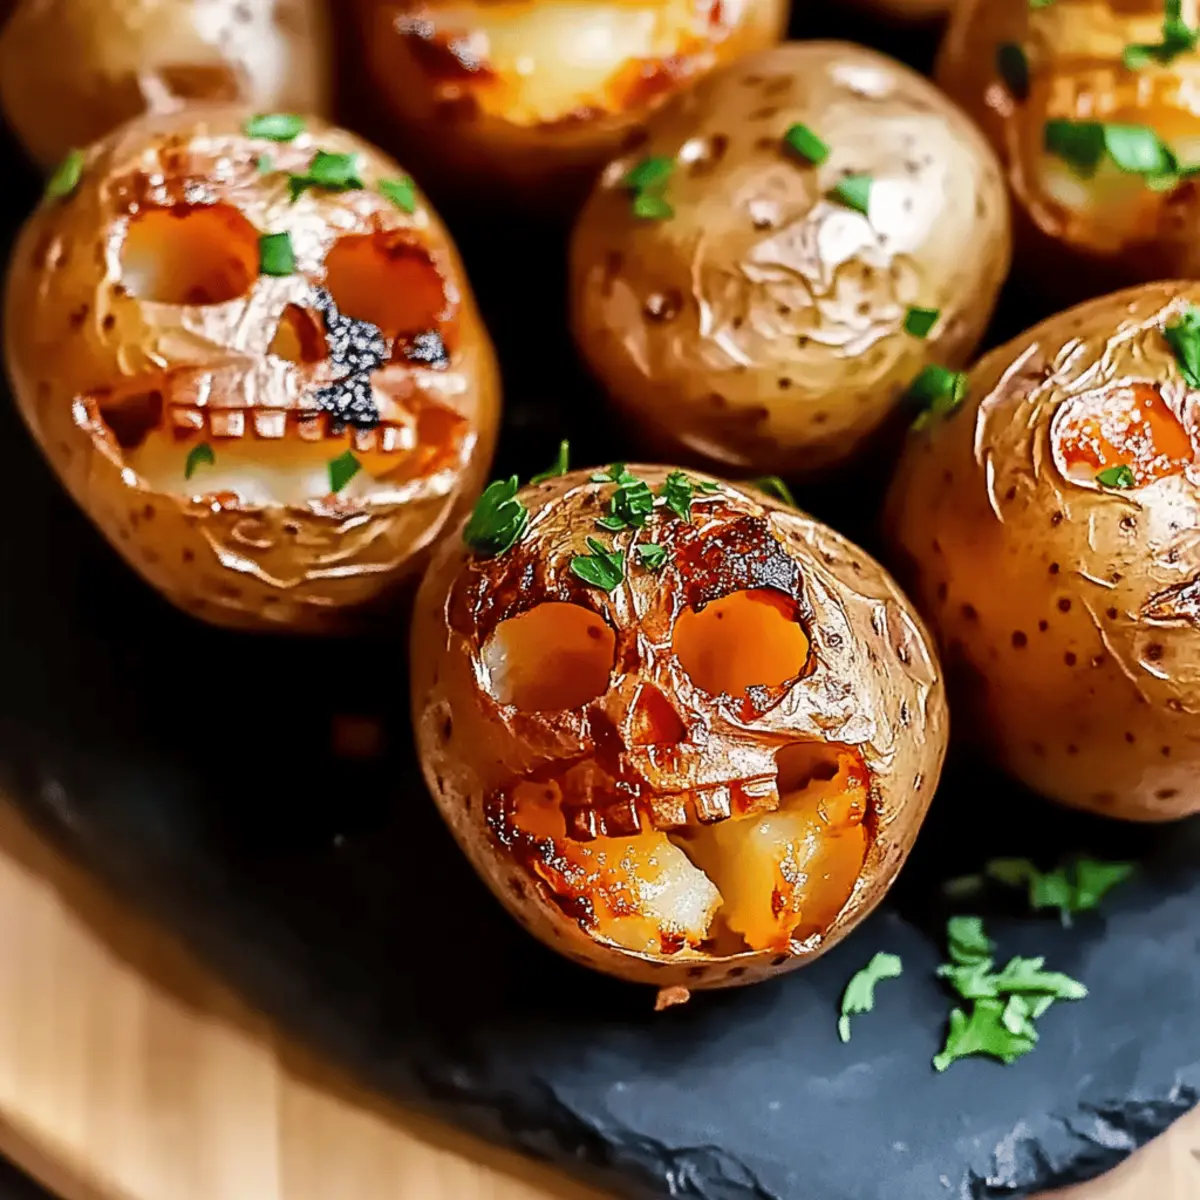
As the crisp autumn air settles in, I find myself drawn into the enchantment of Halloween, where every corner seems to whisper secrets of magic and mischief. Enter the Halloween Skull Potatoes—a delightful marriage of spookiness and scrumptiousness that’s sure to impress your guests. With their crispy exterior and fluffy interior, these creepy little creations are not just visually striking; they’re also a breeze to whip up, transforming a simple dinner into an eerie feast. Beyond being a crowd-pleaser, these spooky side dishes can easily steal the show at any Halloween gathering or family dinner. Curious about how to carve your spuds into frightful fun? Let’s dive into this hauntingly delicious adventure!
Why Are Halloween Skull Potatoes a Must-Try?
Crispy Texture: These Creepy Skull Potatoes feature a perfectly golden and crispy shell, giving each bite an irresistible crunch that everyone will love.
Easy to Make: With simple steps and minimal ingredients, they’re a quick option for home cooks who want to create something memorable without the hassle.
Fun for Everyone: Kids and adults alike will enjoy the playful skull design, making them a hit at any Halloween party or family gathering.
Versatile Side Dish: Pair them with your favorite main course or serve alongside other spooky delights, like Mushroom Skulls Spooky Pasta, for a complete Halloween feast.
Personal Touch: Customize them by adding your favorite toppings – a sprinkle of cheese or fresh herbs can elevate the dish to new delicious heights.
Perfect for Leftovers: These potatoes store well, allowing you to enjoy their delightful flavor in subsequent meals; just re-crisp in the oven for that fresh-out-of-the-oven taste.
Creepy Skull Potatoes Ingredients
For the Potatoes
• Mini Creamer Potatoes or Baby Yukon Golds – These potatoes provide the perfect size and texture for carving spooky skull designs.
• Olive Oil – Aids in achieving that crispy texture; feel free to swap with any vegetable oil you have on hand.
• Salt – Enhances the flavor; adjust to your taste preference for a spooktacular experience.
• Pepper – Adds a hint of mild heat; can be substituted with other fun seasonings to amp up the flavor.
Optional Toppings
• Melted Cheese – Add a gooey layer of cheesy goodness after baking for a delicious twist!
• Fresh Herbs – Sprinkle some greens for a refreshing touch; customize to your liking!
Dive into making these Creepy Skull Potatoes and let the Halloween festivities begin!
Step‑by‑Step Instructions for Creepy Skull Potatoes
Step 1: Preheat the Oven
Begin by preheating your oven to 425°F (220°C). This high temperature is key to achieving that crispy exterior on your Creepy Skull Potatoes. While the oven heats up, gather your baking sheet and line it with parchment paper to prevent sticking and make cleanup easier.
Step 2: Prepare the Potatoes
Scrub and thoroughly dry the mini creamers or baby Yukon Golds in preparation for carving. Using a paring knife, gently carve spooky skull faces into each potato. Ensure that you outline the features clearly before making deeper cuts for best results. This is where the fun begins—let your creativity shine!
Step 3: Season the Potatoes
Drizzle the carved potatoes with a generous amount of olive oil, ensuring they’re well-coated for maximum crispiness. Then, sprinkle salt and pepper over the potatoes to enhance their flavor. Massage the oil and seasonings into the potatoes to ensure an even distribution, leaving no surface bland!
Step 4: Arrange on Baking Sheet
Place the seasoned Creepy Skull Potatoes on your lined baking sheet in a single layer, making sure there’s space between them to allow heat circulation. Overcrowding can lead to soggy potatoes, so if needed, roast them in batches. They should look inviting and ready for the oven!
Step 5: Roast for Crispiness
Slide the baking sheet into your preheated oven and roast the potatoes for 25-30 minutes. Keep an eye on them and turn the tray halfway through for even cooking. They should emerge golden brown and crisp; listen for that delightful crunch as you approach their final minutes!
Step 6: Cool and Serve
Once roasted to perfection, remove the Creepy Skull Potatoes from the oven and let them cool for a few minutes. This cooling period allows for extra crisping. Arrange them on a serving plate and consider adding optional toppings like melted cheese or herbs for that extra festive flair before serving.

Make Ahead Options
These Creepy Skull Potatoes are a fantastic option for meal prep! You can carve and season the potatoes up to 24 hours in advance; simply refrigerate them in an airtight container to keep them fresh and prevent browning. When it’s time to roast, pull them out to let them sit at room temperature for about 15 minutes before baking. This way, they’ll crisp up nicely in the oven. For an extra crispy finish, arrange them on a baking sheet spaced out and roast them as directed. You’ll enjoy the benefits of having a spooky, delicious side dish ready for your Halloween feast with minimal effort!
How to Store and Freeze Creepy Skull Potatoes
Fridge: Store leftover Creepy Skull Potatoes in an airtight container for up to 2 days. This will help maintain their flavor, but they may lose some crispiness.
Freezer: Although best enjoyed fresh, you can freeze unbaked carved potatoes for up to 1 month. Flash freeze them on a baking sheet first, then transfer to a freezer bag or container.
Reheating: To restore crispiness, reheat in a preheated 400°F (200°C) oven for about 10-15 minutes. Enjoy them warm as a delightful Halloween snack or side dish!
Serving Suggestions: These spooky potatoes are perfect to serve alongside your favorite Halloween dinners or at gatherings, making them a versatile addition to any festive table.
What to Serve with Creepy Skull Potatoes?
Celebrate the eerie vibes of Halloween with a complete meal that tantalizes the senses and delights the soul.
-
Bloody Marys: This spicy cocktail packs a punch and adds a cheeky, festive flair to your meal. It’s perfect for kickstarting the Halloween spirit!
-
Spooky Salad: A vibrant mix of greens adorned with roasted pumpkin seeds and a tangy vinaigrette adds a fresh crunch, balancing the rich flavors of the potatoes.
-
Witch’s Brew Soup: A creamy pumpkin soup complements the crispy texture of the potatoes while staying in line with the Halloween theme; it’s warm, comforting, and delicious!
-
Mummy Meatballs: Delicately wrapped in pastry, these meatballs pair perfectly, offering a satisfying bite that echoes the playful nature of your creepy spuds.
-
Ghostly Garlic Bread: Crispy, garlicky bread provides a hearty element that the whole family will love and enhances the meal’s cozy comfort.
-
Haunted Hot Chocolate: For dessert, a mug of rich hot chocolate topped with marshmallows is an enchanting way to end your festive feast. Perfect for sipping while sharing spooky stories!
Expert Tips for Creepy Skull Potatoes
-
Carve Carefully: Take your time with the carving; outlining features before cutting ensures precision and prevents accidents with your knife.
-
Don’t Overcrowd: For crispy results, arrange the potatoes on the baking sheet without overlapping. If needed, roast in batches to maximize crispiness.
-
Cooling is Key: Allow the roasted potatoes to cool slightly before serving. This brief rest enhances their crunch and keeps them looking delectable.
-
Season Generously: Don’t skimp on the olive oil, salt, and pepper. Proper seasoning is essential for enhancing the flavor of your Creepy Skull Potatoes.
-
Try Different Designs: Get creative with your carving! Customize into various spooky faces or patterns to make your dish truly unique and fun for everyone.
Variations & Substitutions for Creepy Skull Potatoes
Feel free to let your creativity flow and customize these spooky potatoes to suit your taste and dietary needs!
-
Dairy-Free: Substitute melted cheese with a sprinkle of nutritional yeast for a cheesy flavor without the dairy.
-
Spicy Twist: Add a pinch of cayenne pepper or chili powder for an extra kick that will scare the taste buds in a good way!
-
Herb-Infused: Toss the potatoes in a blend of garlic powder, dried rosemary, and thyme before roasting them to amplify the flavor with earthy notes.
-
Alternative Toppings: Try adding crispy bacon bits or a dollop of sour cream after baking. These toppings create a delicious contrast to the crispy potatoes!
-
Sweet Potato Variation: Use sweet potatoes instead of mini creamers for a sweet-savory blend that’s still full of spooky charm. Carving them is slightly different but equally fun!
-
Ghostly Appearance: Instead of skulls, carve out pumpkin faces for a fun, whimsical touch that kids will adore. They make a fantastic conversation starter!
-
Herbed Oil: Mix fresh herbs like basil or parsley into your olive oil before drizzling for a fragrant twist that elevates each bite into something special.
-
Roasted Veggie Medley: Add other root vegetables like carrots or parsnips into the mix for a colorful and nutritious medley that complements your Creepy Skull Potatoes beautifully.
With these fun ideas, your spooky creations can continue to surprise and delight! If you’re feeling adventurous, why not try pairing these potatoes with other themed dishes, like Mushroom Skulls Spooky Pasta or even our decadent Halloween Chocolate Skull for a truly eerie feast?
Creepy Skull Potatoes Recipe FAQs
What type of potatoes are best for Creepy Skull Potatoes?
I recommend using Mini Creamer Potatoes or Baby Yukon Golds for their ideal size and texture. These varieties roast evenly and hold up well when carved, unlike larger or waxy potatoes that may not create the same crispy effect.
How do I store leftover Creepy Skull Potatoes?
Store any leftovers in an airtight container in the fridge for up to 2 days. They tend to lose some crispiness, but you can re-crisp them by placing them in a preheated oven at 400°F (200°C) for about 10-15 minutes before serving.
Can I freeze Creepy Skull Potatoes?
Absolutely! You can freeze unbaked carved potatoes for up to 1 month. To do this, first flash freeze the potatoes on a baking sheet until solid. Then, transfer them to a freezer bag or container. When you’re ready to enjoy, just bake them straight from the freezer, adding an extra 5-10 minutes to the cooking time.
What should I do if my potatoes are not getting crispy?
If your Creepy Skull Potatoes aren’t crisping up, it could be due to overcrowding on the baking sheet. Make sure to arrange them in a single layer with space between each potato. Additionally, ensure they are well-coated with olive oil and that your oven is fully preheated to 425°F (220°C) for optimal results.
Are Creepy Skull Potatoes suitable for people with allergies?
These potatoes are generally safe for a wide variety of diets; however, always double-check specific ingredient labels if you have food allergies. Olive oil is a great alternative to butter for a dairy-free option, and you can adjust seasonings to accommodate any dietary restrictions. Always be cautious with toppings, especially cheese, if cooking for guests with dairy allergies.
What are some creative ways to decorate my Creepy Skull Potatoes?
Get creative and have fun with different designs! You can outline various spooky faces by carving more intricate details or creating patterns. Consider using toppings like fresh herbs or different cheeses to personalize your creepy creations and add visual flair, too.

Creepy Skull Potatoes: Spooky Goodness for Halloween Fun
Ingredients
Equipment
Method
- Preheat your oven to 425°F (220°C) and prepare a lined baking sheet.
- Scrub and dry the potatoes, then carve spooky skull faces using a paring knife.
- Drizzle the potatoes with olive oil and season with salt and pepper. Massage to coat evenly.
- Arrange the potatoes on the baking sheet in a single layer for even cooking.
- Roast for 25-30 minutes, turning halfway through until golden brown and crispy.
- Remove from the oven, let cool for a few minutes, and add optional toppings before serving.
Leave a Reply