
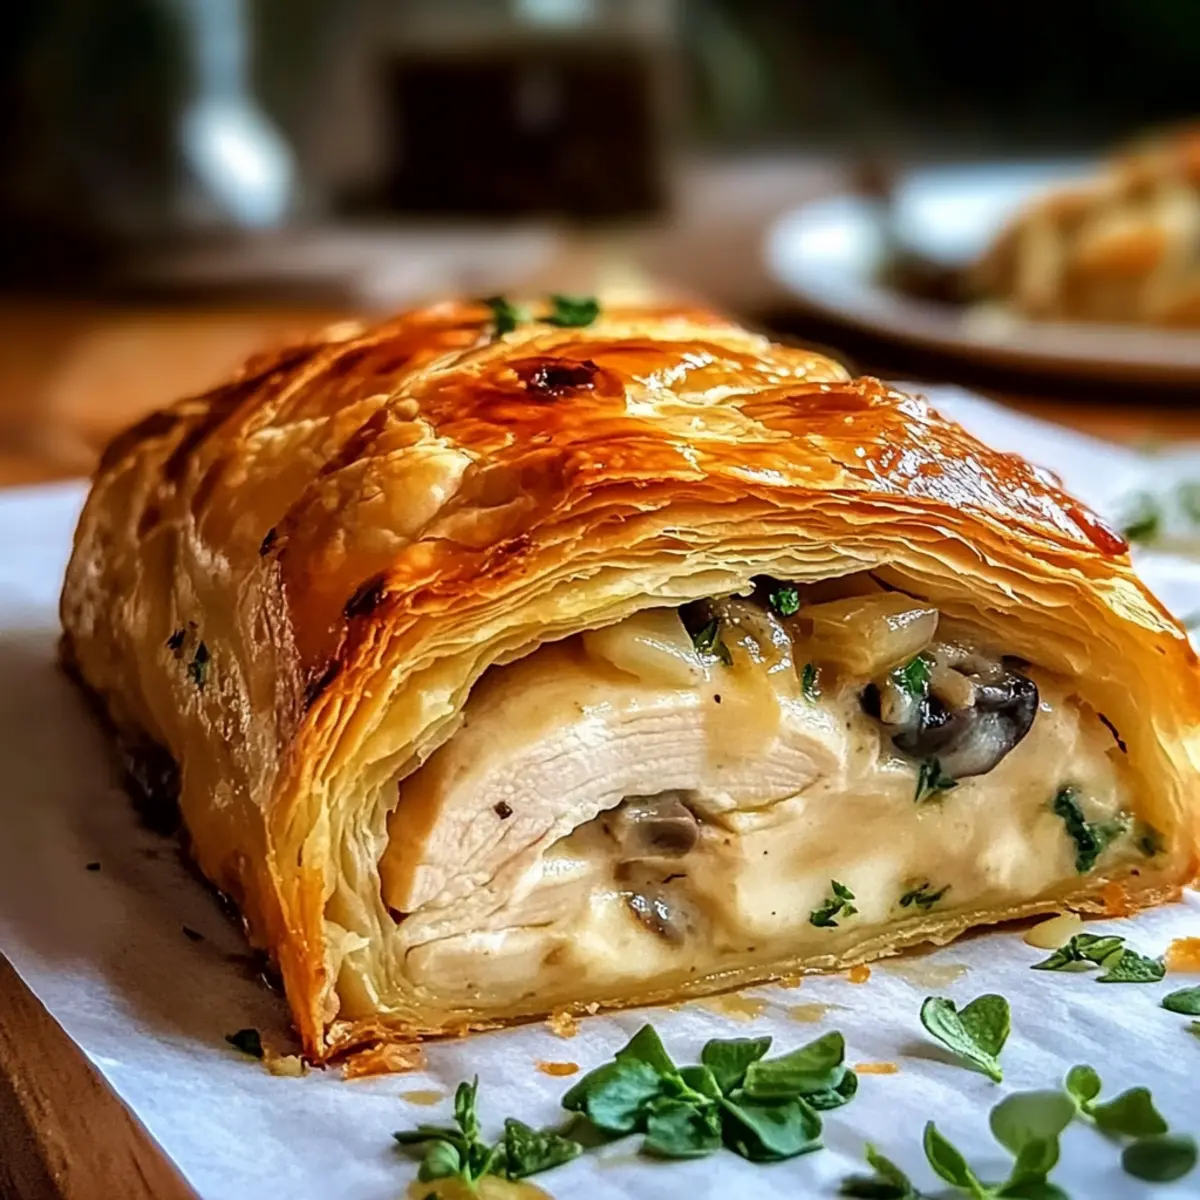
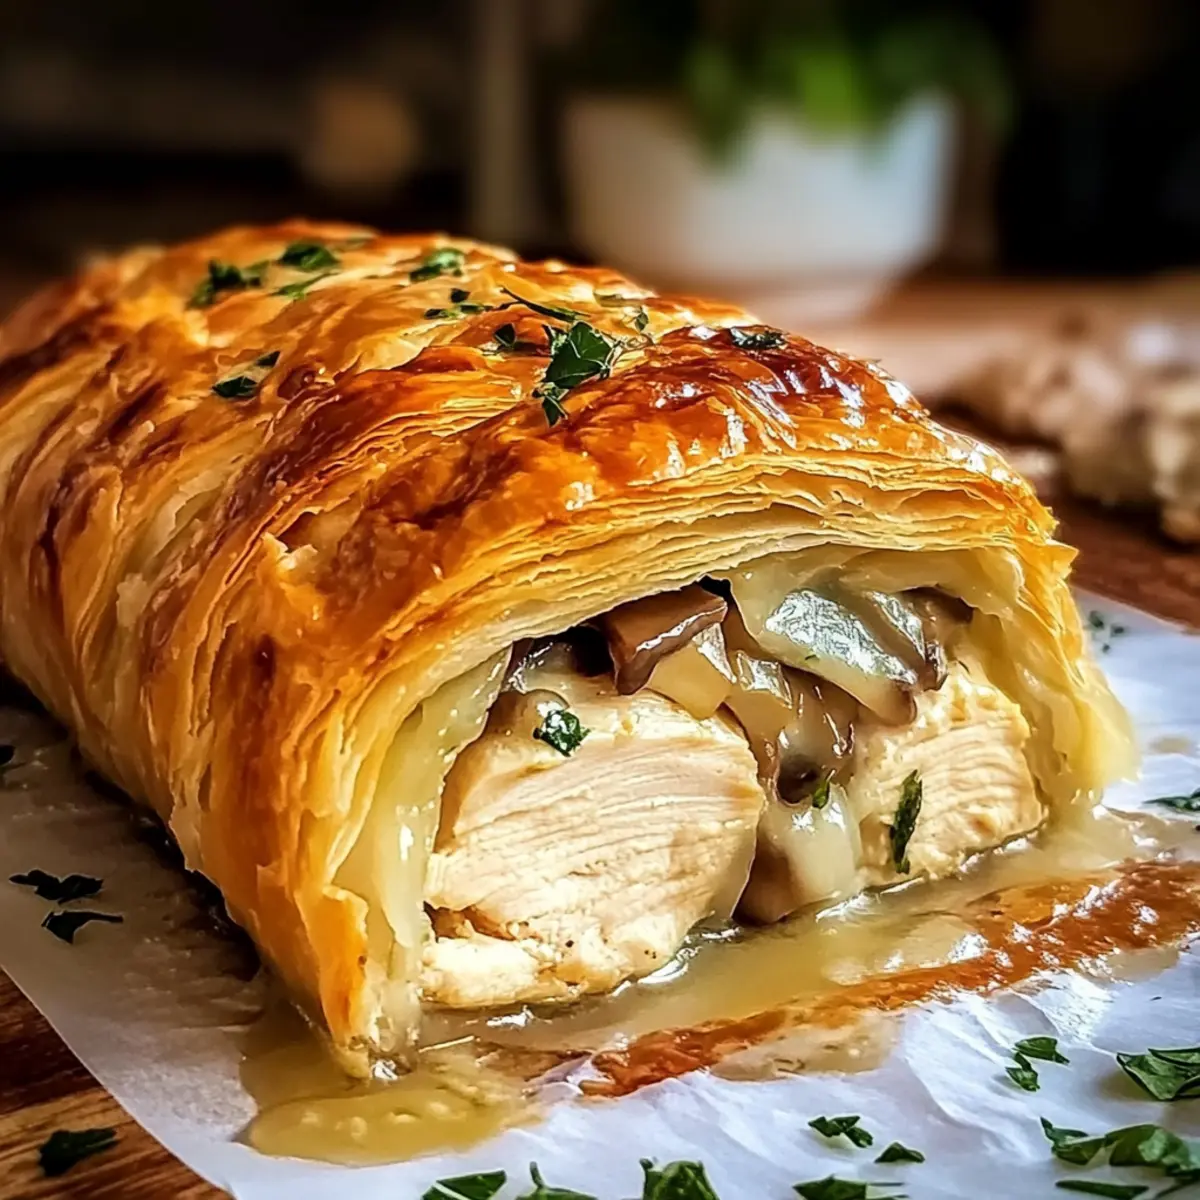
The aroma of golden puff pastry fresh from the oven is nothing short of magical, especially when it wraps around juicy chicken, earthy mushrooms, and savory prosciutto. This Chicken Wellington isn’t just a meal; it’s an easy recipe that transforms a casual dinner into a gourmet experience. Perfect for both weekdays and special occasions, it offers a delightful centerpiece that pleases every palate. Plus, the beauty of this dish lies in its versatility: you can enjoy it as a quick dinner or impress guests during the holidays, all while having the option to customize it to fit gluten-free diets. Curious about how to achieve that flaky perfection and sumptuous filling? Let’s dive into the magic of making your own Chicken Wellington!
Why is Chicken Wellington So Irresistible?
Flaky Perfection: The buttery, crisp puff pastry forms a stunning contrast to the succulent chicken, making every bite feel like a celebration.
Gourmet Made Easy: This recipe simplifies a traditionally complex dish, allowing you to impress without stress. Ideal for busy weeknights or elegant gatherings, it’s a true time-saver.
Endless Variations: Whether you prefer a lighter twist with sautéed spinach and cream cheese or a gluten-free option, there’s a way to make this dish fit your needs perfectly.
Crowd-Pleasing Delight: Friends and family will rave about this dish—serving it promises smiles around the table. For more fantastic chicken ideas, check out my Honey Lime Chicken for a vibrant twist or Healthy Sticky Chicken for a nutritious option!
Satisfying Comfort: It’s the ultimate combination of cozy and classy, satisfying cravings and elevating your dinner routine!
Chicken Wellington Ingredients
For the Filling
- Chicken Breast – the star of this dish; boneless and skinless ensures tenderness.
- Mushrooms – finely chopped for umami richness; sauté to keep moisture at bay.
- Prosciutto – adds a savory depth; can be swapped with bacon or excluded for a lighter touch.
- Shallots – milder than onions, they add a hint of sweetness to balance flavors.
- Garlic – enhances the overall flavor profile of the filling; don’t skip this one!
For the Pastry
- Puff Pastry – the flaky outer layer that defines this Chicken Wellington; opt for high-quality all-butter pastry for best results.
- Egg Yolk – brushed on for a beautiful golden finish; makes it shine and adds flavor.
For Sautéing
- Olive Oil – used for cooking the chicken and vegetables; adds a nice flavor without overpowering.
- Butter – enriches the filling with a silky texture; perfect for sautéing the mushrooms and shallots.
For Flavor
- Dijon Mustard – a touch of tanginess that elevates the chicken Wellington; don’t skip it!
This Chicken Wellington packs layers of flavor and flaky goodness that will leave your guests asking for seconds!
Step‑by‑Step Instructions for Chicken Wellington
Step 1: Sear the Chicken
Begin by seasoning the boneless, skinless chicken breasts with salt and pepper. Heat a tablespoon of olive oil in a skillet over medium-high heat. Sear the chicken for about 3–4 minutes on each side until golden brown. Remove the chicken from the pan and allow it to cool completely before wrapping it later in the Chicken Wellington.
Step 2: Prepare the Duxelles
In the same skillet, melt 2 tablespoons of butter over medium heat. Add finely chopped mushrooms, shallots, and minced garlic, sautéing for about 5–7 minutes until the mixture is golden and moisture has evaporated, creating a paste-like consistency. Set aside the duxelles to cool completely before combining with the chicken.
Step 3: Assemble the Chicken Wellington
On a sheet of plastic wrap, layer slices of prosciutto, slightly overlapping them. Spread the cooled mushroom duxelles evenly over the prosciutto, then place the cooled chicken in the center. Using the plastic wrap, tightly roll the chicken and stuffing into a log shape. Chill this roll in the refrigerator for about 15–20 minutes to ensure it holds together well in the Chicken Wellington.
Step 4: Roll Out the Puff Pastry
While the chicken roll chills, preheat your oven to 400°F (200°C). On a lightly floured surface, roll out the puff pastry into a rectangle, approximately 1/8 inch thick, ensuring it remains cold for a better rise. Place the chilled chicken roll at the center of the pastry, making it ready for a beautiful envelopment.
Step 5: Wrap the Chicken
Carefully fold the puff pastry over the chicken roll, sealing all edges tightly to prevent any filling from escaping. If desired, use a fork to crimp the edges for a decorative touch. Once wrapped, chill the Chicken Wellington in the refrigerator for 10 minutes to firm up before baking.
Step 6: Prepare for Baking
In a small bowl, whisk an egg yolk with a splash of water to create an egg wash. Brush this mixture generously over the top and sides of the Chicken Wellington, giving it a beautiful golden finish. Use a sharp knife to cut small slits in the pastry for steam to escape during baking, ensuring a flaky texture.
Step 7: Bake the Wellington
Place the Chicken Wellington on a baking sheet lined with parchment paper and bake it in the preheated oven for 25–30 minutes, or until the pastry is golden brown and crispy. Keep an eye on it during the last few minutes to achieve your desired level of crispiness.
Step 8: Rest and Slice
Once baked, remove the Chicken Wellington from the oven and let it rest for about 5 minutes. This resting time allows the juices to redistribute, ensuring every slice is juicy and flavorful. Slice it carefully and serve to delight your family or guests!

Expert Tips for Making Chicken Wellington
-
Cool Down: Ensure the chicken and mushroom filling are completely cool before wrapping. This prevents the pastry from becoming soggy, maintaining that flaky texture.
-
Puff Pastry Pointers: Use properly chilled puff pastry for the best rise and flakiness. If it feels too warm or soft, pop it back in the fridge for a few minutes.
-
Juicy Chicken: Avoid overcooking the chicken when searing; the goal is golden brown on the outside while remaining juicy inside. This is key for the perfect Chicken Wellington.
-
Egg Wash Magic: Brush the top with egg yolk for a golden finish, but don’t forget to cut slits for steam escape. This helps the pastry bake evenly and prevents it from getting soggy.
-
Rest for Perfection: Let the Chicken Wellington rest for 5 minutes after baking before slicing. This helps retain moisture, ensuring each slice is packed with flavor.
-
Flavor Variations: Feel free to experiment with fillings! Adding spinach or using different meats can add your personal touch to the Chicken Wellington while maintaining its heartiness.
Make Ahead Options
These Chicken Wellington pastries are perfect for meal prep enthusiasts! You can assemble the entire dish up to 24 hours in advance. Make sure to cool the chicken and duxelles completely before wrapping them to maintain that flaky texture without sogginess. Once assembled and wrapped in puff pastry, refrigerate the unbaked Chicken Wellington until you’re ready to pop it in the oven. When you’re ready to enjoy it, simply brush the pastry with the egg wash and bake as directed. This method allows for quick weeknight dinners or impressing guests with minimal effort—all while ensuring your dish remains just as delicious!
What to Serve with Chicken Wellington
The perfect sides elevate your Chicken Wellington experience, creating a harmonious balance of flavors and textures.
-
Creamy Mashed Potatoes: The rich, buttery texture of mashed potatoes pairs beautifully, soaking up any delicious juices from the Wellington.
-
Garlic-Butter Asparagus: Crisp-tender asparagus tossed in garlic and butter adds freshness and a delightful crunch to your meal. It’s a great way to incorporate green goodness!
-
Light Mixed Green Salad: A simple salad with a zesty vinaigrette contrasts the hearty Wellington, offering a refreshing bite that cleanses the palate.
-
Savory Roasted Vegetables: A colorful medley of roasted seasonal vegetables brings sweetness and depth, complementing the savory chicken perfectly.
-
Herbed Rice Pilaf: Fluffy rice infused with herbs adds an aromatic touch that enhances the flavors of the Chicken Wellington without overpowering it.
-
Crispy Brussels Sprouts: Roasted or sautéed Brussels sprouts with a touch of balsamic glaze provide a delightful bitterness that balances the richness of the dish.
-
Sparkling White Wine: Pair a chilled bottle of sparkling wine; its acidity cuts through the richness of the pastry, elevating your dining experience to something truly special.
-
Decadent Chocolate Mousse: For dessert, indulge in a light chocolate mousse that rounds off your meal with sweetness, perfectly matching the elegance of the Chicken Wellington.
How to Store and Freeze Chicken Wellington
-
Fridge: Store any leftover Chicken Wellington in an airtight container in the fridge for up to 3 days. Reheat in the oven at 350°F (175°C) for about 15 minutes to crisp the pastry back up.
-
Freezer: If you want to freeze the Chicken Wellington, wrap it tightly in plastic wrap and then in aluminum foil. It can be frozen for up to 3 months. Bake from frozen at 400°F (200°C), adding an extra 10-15 minutes to the baking time.
-
Make-Ahead: You can assemble the Chicken Wellington in advance and keep it in the fridge for up to 24 hours before baking. This makes it a perfect option for stress-free entertaining!
-
Reheating: When reheating leftovers, avoid the microwave as it will make the pastry soggy. Instead, heat in the oven for the best results to maintain that delicious flaky crust.
Chicken Wellington Variations & Substitutions
Customize this Chicken Wellington to fit your tastes and dietary preferences—there’s a world of delicious options waiting for you!
-
Gluten-Free: Use a gluten-free puff pastry alternative to make this dish accessible for those with gluten sensitivities.
-
Spinach Cream Cheese: Replace the mushroom duxelles with sautéed spinach and cream cheese for a milder, creamy filling.
-
Thighs Instead of Breasts: Opt for boneless chicken thighs for a juicier, richer flavor and a different texture profile.
-
Bacon Twist: Swap prosciutto for crispy bacon for a smoky punch in flavor—just be sure to adjust the salt accordingly!
-
Herb-Infused: Enhance the duxelles with fresh herbs like thyme or rosemary to give an aromatic twist that complements the chicken beautifully.
-
Vegetarian Version: For a meatless option, fill the Wellington with a mixture of roasted vegetables and lentils, seasoned well for depth of flavor.
-
Spicy Kick: Add a pinch of red pepper flakes to your duxelles for a touch of heat. This can elevate the flavors and excite your taste buds!
-
Nutty Pesto: Spread a layer of basil pesto on the prosciutto for an extra layer of flavor—it’s perfect for those who love a herbaceous accent!
Each of these variations will ensure your Chicken Wellington shines no matter the occasion! If you’re looking for something different, you might also enjoy my Spicy Chipotle Chicken or a cozy Cheesy Chicken Garlic for a delightful twist on chicken!
Chicken Wellington Recipe FAQs
What type of chicken should I use for Chicken Wellington?
I recommend using boneless, skinless chicken breasts for their tenderness and ease of preparation. They cook evenly and stay juicy inside the flaky pastry. If you prefer a different texture or flavor, feel free to swap them for boneless chicken thighs!
How should I store leftover Chicken Wellington?
To keep your Chicken Wellington fresh, place any leftovers in an airtight container in the fridge for up to 3 days. When you’re ready to enjoy it again, reheat it in the oven at 350°F (175°C) for about 15 minutes. This way, it retains its flaky crust and doesn’t become soggy.
Can I freeze Chicken Wellington?
Absolutely! You can freeze Chicken Wellington before baking. Wrap it tightly in plastic wrap followed by aluminum foil to prevent freezer burn. It will stay good for up to 3 months. When baking from frozen, set your oven to 400°F (200°C) and add an extra 10-15 minutes to the baking time. Just keep an eye on it to ensure it bakes to a golden perfection.
What if my duxelles filling is too moist?
If your mushroom duxelles turns out too moist, simply continue to cook it on medium heat, stirring frequently, until most of the moisture evaporates. Look for a paste-like consistency that holds its shape. This helps to prevent any sogginess in the pastry. Use this tip to always achieve a great balance!
Can I make Chicken Wellington ahead of time?
Yes! You can assemble your Chicken Wellington and keep it wrapped in the fridge for up to 24 hours before baking. This is a perfect option if you’re preparing for a special occasion—just pop it in the oven when your guests arrive!
Are there any dietary considerations for Chicken Wellington?
If you’re looking for gluten-free options, there are several gluten-free puff pastry alternatives on the market that work beautifully. Additionally, for a lighter version, consider omitting the prosciutto or substituting it with turkey bacon to fit various dietary needs.

Melt-in-Your-Mouth Chicken Wellington Made Easy
Ingredients
Equipment
Method
- Begin by seasoning the boneless, skinless chicken breasts with salt and pepper. Heat a tablespoon of olive oil in a skillet over medium-high heat. Sear the chicken for about 3–4 minutes on each side until golden brown. Remove the chicken from the pan and allow it to cool completely before wrapping it later in the Chicken Wellington.
- In the same skillet, melt 2 tablespoons of butter over medium heat. Add finely chopped mushrooms, shallots, and minced garlic, sautéing for about 5–7 minutes until the mixture is golden and moisture has evaporated, creating a paste-like consistency. Set aside the duxelles to cool completely before combining with the chicken.
- On a sheet of plastic wrap, layer slices of prosciutto, slightly overlapping them. Spread the cooled mushroom duxelles evenly over the prosciutto, then place the cooled chicken in the center. Using the plastic wrap, tightly roll the chicken and stuffing into a log shape. Chill this roll in the refrigerator for about 15–20 minutes to ensure it holds together well in the Chicken Wellington.
- While the chicken roll chills, preheat your oven to 400°F (200°C). On a lightly floured surface, roll out the puff pastry into a rectangle, approximately 1/8 inch thick, ensuring it remains cold for a better rise. Place the chilled chicken roll at the center of the pastry, making it ready for a beautiful envelopment.
- Carefully fold the puff pastry over the chicken roll, sealing all edges tightly to prevent any filling from escaping. If desired, use a fork to crimp the edges for a decorative touch. Once wrapped, chill the Chicken Wellington in the refrigerator for 10 minutes to firm up before baking.
- In a small bowl, whisk an egg yolk with a splash of water to create an egg wash. Brush this mixture generously over the top and sides of the Chicken Wellington, giving it a beautiful golden finish. Use a sharp knife to cut small slits in the pastry for steam to escape during baking, ensuring a flaky texture.
- Place the Chicken Wellington on a baking sheet lined with parchment paper and bake it in the preheated oven for 25–30 minutes, or until the pastry is golden brown and crispy. Keep an eye on it during the last few minutes to achieve your desired level of crispiness.
- Once baked, remove the Chicken Wellington from the oven and let it rest for about 5 minutes. This resting time allows the juices to redistribute, ensuring every slice is juicy and flavorful. Slice it carefully and serve to delight your family or guests!
Leave a Reply