
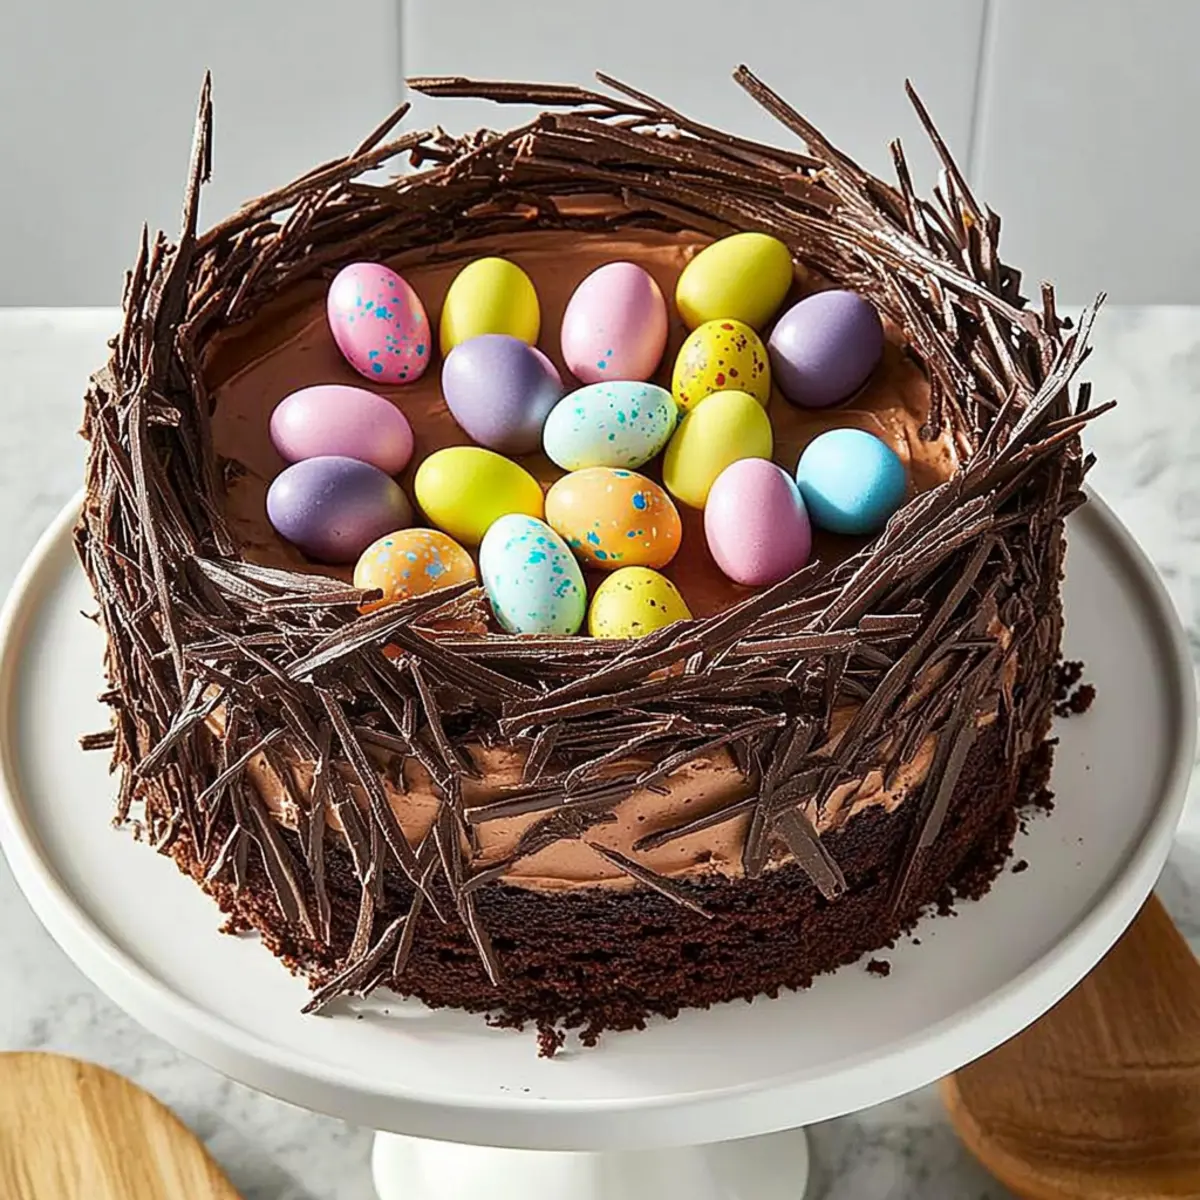
As I carefully unwrapped the layers of silky chocolate mousse and rich cake, my excitement bubbled over—this was no ordinary treat. The Easter Nest Cake is a showstopper, perfect for spring celebrations, with its intricate design that mimics a bird’s nest filled with colorful candy eggs. Not only is it a stunning centerpiece for your holiday table, but it also boasts the irresistible perk of being a crowd-pleaser that will impress family and friends alike. Each slice offers a delightful balance of textures, combining a moist chocolate cake with creamy layers that melt in your mouth. Get ready to step up your dessert game this Easter—I can’t wait to share how you can create this delicious masterpiece! Are you ready to dive into the magic of this Easter Nest Cake?
Why is this Easter Nest Cake special?
Showstopper Presentation: This cake is not just delicious; it’s a stunning centerpiece that mimics a warm, cozy nest filled with vibrant candy eggs, capturing the spirit of spring.
Irresistibly Rich: With layers of moist chocolate cake and luscious chocolate mousse, every bite is an indulgent delight that satisfies any chocolate lover’s cravings.
Versatile Decor: Get creative with toppings! Swap out M&M’s for fresh berries or decorative flowers to match your holiday theme.
Time for Togetherness: Perfect for shared moments, this cake is a fun project for family or friends to enjoy making together—creating memories while crafting something special.
Easily Scalable: Want to serve a crowd? The recipe easily scales, making it simple to adjust for larger gatherings, just like the delightful Chocolate Skull Cake.
Truly Unique Flavor: Unlike average desserts, the rich, unique flavor profile of this cake will astonish your guests and keep them coming back for seconds—really, who can resist?
Easter Nest Cake Ingredients
For the Cake
- Unsalted Butter — Provides richness and moisture; use unsalted for control over salt.
- Granulated Sugar — Adds sweetness; can substitute with a sugar alternative for a lower-calorie option.
- Large Eggs — Adds structure and moisture; always use room temperature for better incorporation.
- All-Purpose Flour — Acts as the base for the cake structure; gluten-free flour can work as a substitute.
- Baking Cocoa — Imparts chocolate flavor and color; dark cocoa enhances richness.
- Baking Powder — Acts as a leavening agent for a light cake; don’t swap without adjusting other ingredients.
- Salt — Enhances flavor; can be omitted for low-sodium diets.
For the Chocolate Mousse Filling
- Semisweet Chocolate (8 oz) — Base for the chocolate band, adding a rich flavor; use bittersweet for a more intense taste.
- Granulated Sugar (Filling – 1/4 cup) — Adds sweetness to the mousse; alternative sweeteners can be used as desired.
- Cornstarch — Thickens the mousse filling; can substitute with flour, but texture may differ.
- Milk (2%) — Adds creaminess; substitute with whole milk or dairy-free alternatives.
- Egg Yolks (3) — Creates richness; use yolks only for the correct texture.
- Unflavored Gelatin — Stabilizes the mousse; cannot substitute with flavored gelatin.
- Cold Water — Activates gelatin; no substitute noted.
- Chopped Semisweet Chocolate (7 oz) — Enhances mousse richness; mix in dark chocolate for deeper flavor.
- Heavy Whipping Cream (1-1/4 cups) — Whipped for a light, airy mousse; coconut cream is a good substitute for dairy-free mousse.
For the Decoration
- M&M’s Peanut Chocolate Eggs — Decorative topping to represent eggs; substitute with jelly beans or chocolate truffles if nuts are an issue.
- Baking Cocoa (optional) — For dusting before serving to enhance presentation.
Each of these ingredients contributes to the delectable layers and festive charm of this Easter Nest Cake, making it a perfect addition to your dessert table this holiday season!
Step‑by‑Step Instructions for Easter Nest Cake
Step 1: Preheat and Prepare
Begin by preheating your oven to 350°F (175°C). In a large mixing bowl, cream 1 cup of unsalted butter and 1 cup of granulated sugar together for 5-7 minutes until the mixture is light and fluffy. Next, add in the eggs one at a time, ensuring each egg is fully incorporated before adding the next, creating a smooth batter.
Step 2: Mix Dry Ingredients
In a separate bowl, whisk together 2 cups of all-purpose flour, ¾ cup of baking cocoa, 1 tablespoon of baking powder, and ½ teaspoon of salt. Gradually add this dry mixture to the creamed butter and sugar combination. Mix until just combined; the batter should be thick and well-blended, ready for baking into the delightful Easter Nest Cake.
Step 3: Bake the Cake
Pour the cake batter into a greased 9-inch springform pan, ensuring an even layer across the bottom. Place the pan in your preheated oven and bake for 15-20 minutes. Check for doneness by inserting a toothpick in the center; it should come out clean. Let the cake cool in the pan for 10 minutes before transferring it to a wire rack to cool completely.
Step 4: Create the Chocolate Band
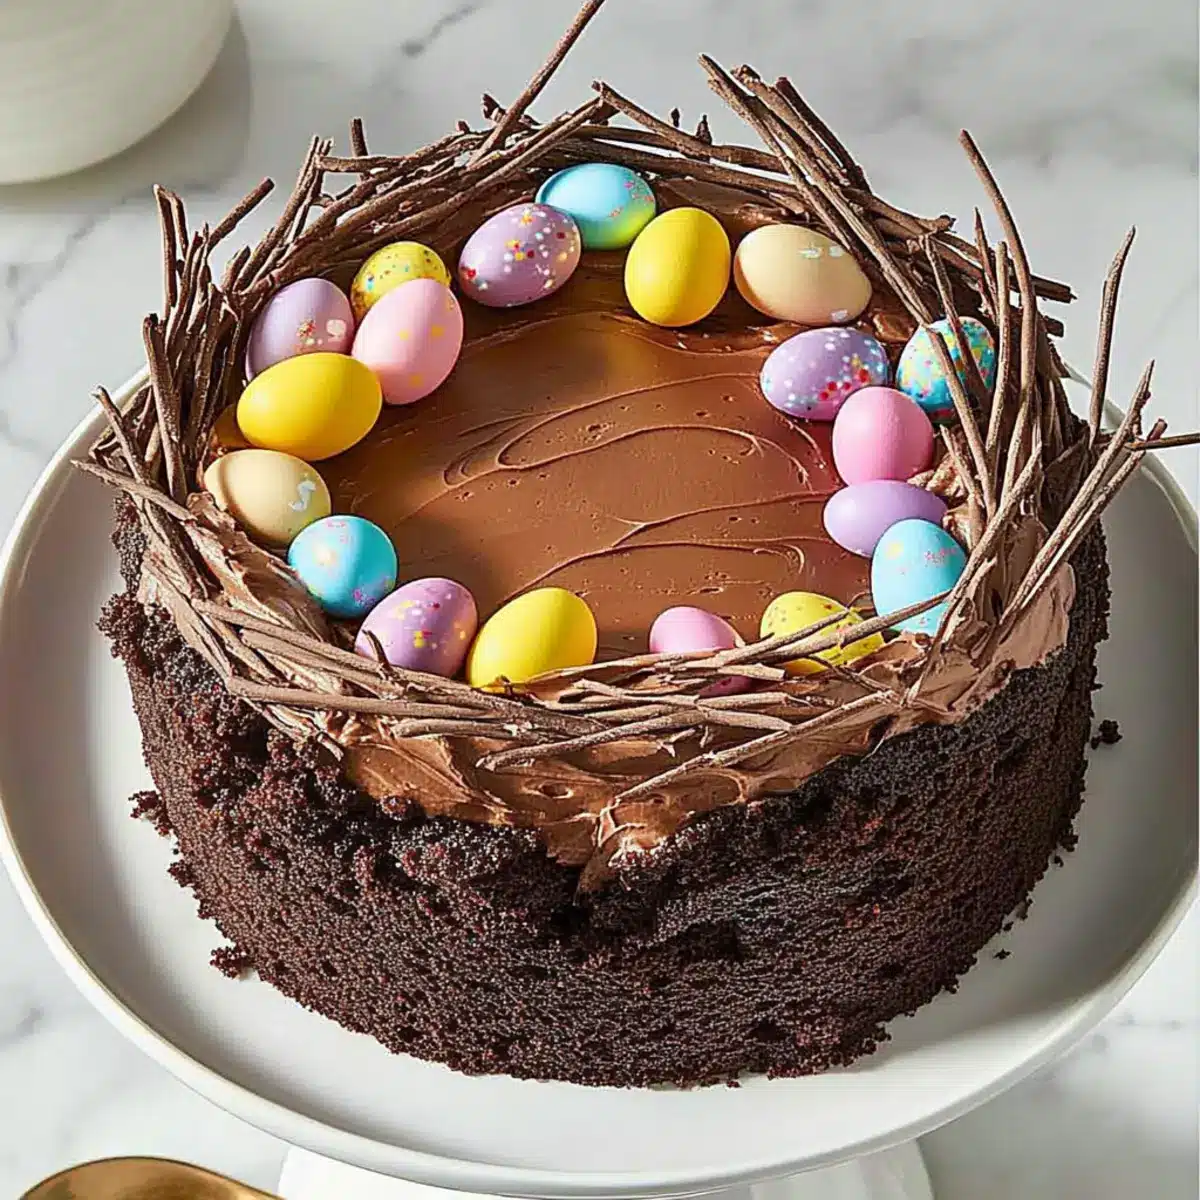
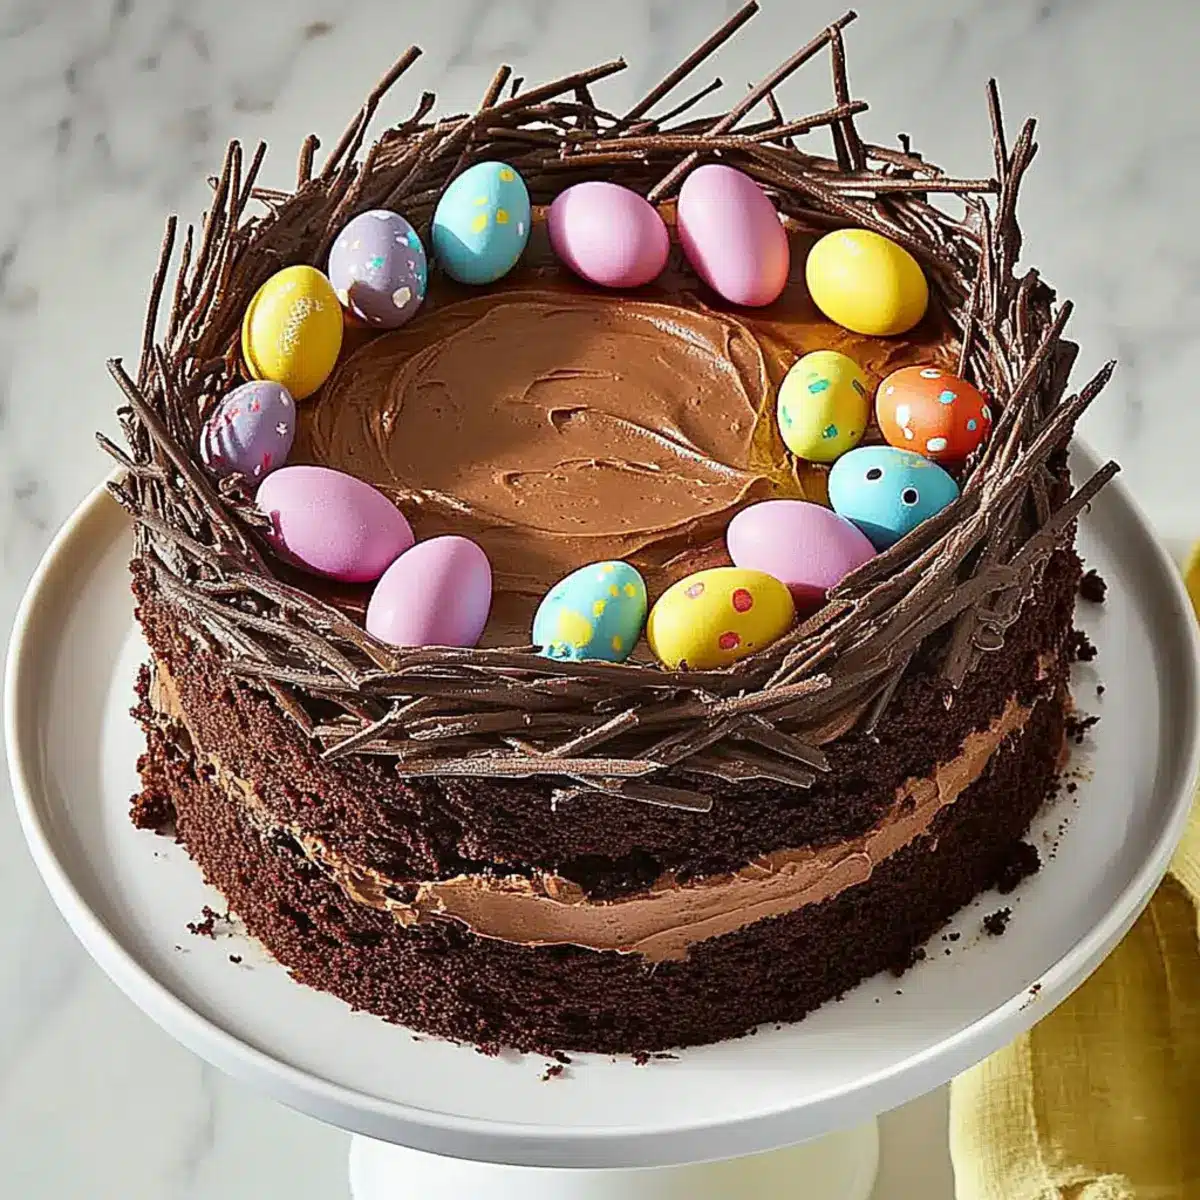
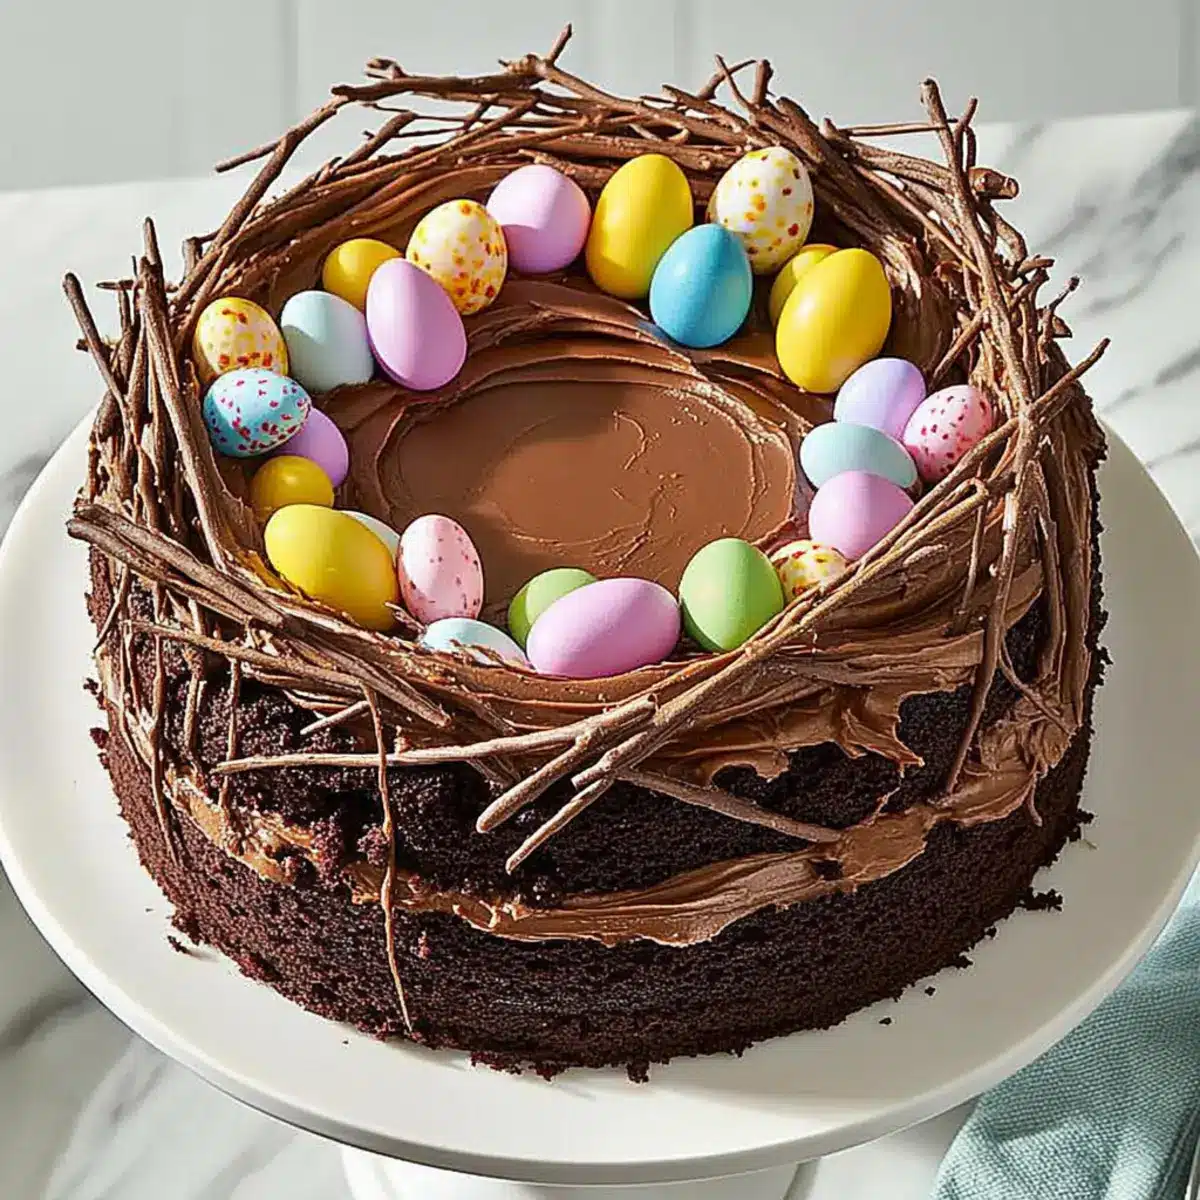
While the cake cools, prepare the chocolate band. Cut a strip of wax paper approximately 3 inches wide and the length of the cake’s circumference. Melt 8 ounces of semisweet chocolate, then spread half of it on one side of the wax paper. Allow the chocolate to set, then wrap the band around the cooled cake. Refrigerate until firm.
Step 5: Form Chocolate Twigs
To create chocolate twigs, take the remaining melted chocolate and drizzle it in thin lines on another piece of wax paper. Place this in the refrigerator until the chocolate hardens. Once set, carefully break the chocolate into twig-like shapes to decorate your lovely Easter Nest Cake.
Step 6: Prepare the Chocolate Mousse Filling
In a saucepan, mix ¼ cup of sugar and 2 tablespoons of cornstarch with 1 cup of 2% milk over medium heat. Stir continuously until the mixture thickens. Temper the 3 egg yolks by adding a small amount of the hot mixture to them, then gradually return this to the saucepan, cooking until bubbly. Remove from heat to cool.
Step 7: Combine Gelatin and Chocolate
Dissolve 1 tablespoon of unflavored gelatin in 2 tablespoons of cold water, letting it sit for a few minutes. Stir the gelatin into the thickened mixture, then add 7 ounces of chopped semisweet chocolate. Mix until you achieve a smooth consistency, then cool to room temperature before proceeding with the mousse.
Step 8: Whip and Fold the Cream
In a separate bowl, whip 1¼ cups of heavy whipping cream to soft peaks. Gently fold the whipped cream into the cooled chocolate mixture to create a light and airy mousse. Spoon this luscious mousse over the cooled cake, smoothing the top. Refrigerate for 1-2 hours, allowing it to set beautifully.
Step 9: Decorate and Serve
Once the mousse has set, carefully peel away the wax paper from the chocolate band. Decorate the top with the chocolate twigs and colorful M&M’s peanut chocolate eggs, representing cheerful little eggs in your Easter Nest Cake. For an added touch, you may dust with cocoa before serving, making this cake a truly festive centerpiece.
How to Store and Freeze Easter Nest Cake
Room Temperature: Keep the Easter Nest Cake covered with a cake dome at room temperature for up to 2 days for optimal texture and taste.
Fridge: Store any leftovers in an airtight container in the fridge for up to 4 days. If the mousse becomes too firm, let it sit at room temperature for a few minutes before serving.
Freezer: To freeze, wrap the cake tightly in plastic wrap and aluminum foil. It can last up to 2 months in the freezer. Thaw in the fridge overnight before serving.
Reheating: If you prefer a slightly warm slice, gently heat individual pieces in the microwave for 10-15 seconds. Enjoy the heavenly flavor of your Easter Nest Cake!
Expert Tips for Easter Nest Cake
-
Cool Before Mousse: Always ensure the cake has completely cooled before adding the mousse. This prevents the mousse from melting and ensures a perfect layering.
-
Perfect Cake Layers: For a more even bake, rotate the cake halfway through the baking time. This helps achieve a moist, fluffy texture without any overbaked edges.
-
Use Room Temperature Ingredients: Allow your eggs and butter to sit at room temperature before mixing. This ensures better incorporation and creates a light, airy cake.
-
Avoid Chocolate Bloom: To prevent that unsightly white powder on melted chocolate, make sure your chocolate is properly tempered before forming your chocolate twigs.
-
Cutting Tips: For neat slices, use a knife dipped in hot water. Wipe the knife clean between cuts for pristine pieces of your Easter Nest Cake.
-
Flavor Variations: Want to switch it up? Experiment with different flavored chocolate or add a splash of espresso to the mousse for an unexpected twist!
Make Ahead Options
These Easter Nest Cakes are perfect for busy home cooks looking to save time! You can prepare the chocolate cake up to 24 hours in advance; just cool it completely, then wrap it tightly in plastic wrap to prevent drying out. The chocolate mousse can also be made a day ahead and stored in an airtight container in the refrigerator, ensuring it remains light and airy. On the day of serving, simply spoon the mousse over the cooled cake, and then decorate with chocolate twigs and candy eggs. This way, you’ll enjoy a stress-free and delightful centerpiece, all while impressing your guests with your delicious homemade Easter Nest Cake!
What to Serve with Easter Nest Cake
As your Easter Nest Cake takes center stage, consider these delightful complements to elevate your holiday feast.
-
Fresh Berries: Their tartness cuts through the rich chocolate, adding a light, refreshing contrast that perfects each bite.
-
Whipped Cream: Light and airy, a dollop of fresh whipped cream enhances the creaminess of the mousse while adding a touch of sweetness.
-
Vanilla Ice Cream: A scoop of creamy vanilla ice cream beside the cake creates a lovely temperature contrast, enriching the dessert experience.
-
Chocolate Pudding: For the ultimate chocolate lover, serve alongside a small cup of rich chocolate pudding to amplify those delicious cocoa flavors.
Imagine the smoothness of a chocolate pudding partnered with a slice of fluffy cake—pure indulgence that pleases everyone at the table.
-
Espresso: A shot of espresso or coffee offers a delightful bitterness that beautifully complements the sweetness of your Easter Nest Cake.
-
Spring Salad: A vibrant salad with mixed greens, goat cheese, and strawberries adds a fresh, crisp bite, balancing the richness of your dessert.
-
Mimosa: Toast to the special day with a refreshing mimosa, where the citrus brightens up the palate beautifully against chocolate’s richness.
These pairings create not just a meal but a memorable celebration—perfect to savor and enjoy with your loved ones this Easter!
Easter Nest Cake Variations & Substitutions
Customize your Easter Nest Cake to reflect your taste and make it uniquely yours, blending flavors and textures that excite the senses!
-
White Chocolate: Substitute semisweet chocolate with white chocolate for a sweeter, lighter mousse that creates a pleasing contrast with the cake.
-
Fresh Berries: Swap M&M’s with fresh raspberries or strawberries for a burst of tartness; they add a beautiful pop of color as well!
-
Gluten-Free: Replace all-purpose flour with a gluten-free blend to create a dessert that everyone can enjoy, without sacrificing flavor or texture.
-
Coconut Cream: For a dairy-free option, use whipped coconut cream instead of heavy whipping cream in the mousse, lending a delightful tropical twist.
-
Espresso Infusion: Stir in a tablespoon of espresso powder to the mousse mix for a decadent mocha flavor that chocolate lovers will adore.
-
Mint Chocolate: Add a few drops of peppermint extract to the mousse for a refreshing minty zing that brightens the rich chocolate cake.
-
Decorative Edible Flowers: Top with edible flowers instead of candy to elevate your Easter celebrations, creating a stunning centerpiece that’s also a treat for the eyes.
-
Chocolate Truffles: You can switch up the decorations by using homemade or store-bought chocolate truffles instead of candy eggs for a luxurious finish.
When you’re ready to continue your baking adventures, consider trying out my Pumpkin Cake Cozy for a heartwarming seasonal dessert, or whip up my Oreo Poke Cake for a quick, fun treat. Enjoy experimenting with these delightful variations!
Easter Nest Cake Recipe FAQs
What type of chocolate should I use for the Easter Nest Cake?
I recommend using semisweet chocolate for a balanced sweetness in the mousse and chocolate band. If you prefer a more intense chocolate flavor, bittersweet chocolate is an excellent choice!
How do I know if my cake is baked perfectly?
For perfect baking, insert a toothpick into the center of the cake. It should come out clean or with just a few moist crumbs attached—no wet batter! This usually takes about 15-20 minutes at 350°F.
What is the best way to store leftover Easter Nest Cake?
Keep leftover cake covered with a cake dome at room temperature for up to 2 days for the best taste. If you store it in the refrigerator, an airtight container allows it to stay fresh for up to 4 days. Enjoy each slice at room temperature for the best flavor!
Can I freeze the Easter Nest Cake?
Absolutely! To freeze your Easter Nest Cake, wrap it tightly in plastic wrap and then cover it with aluminum foil. It will stay fresh for up to 2 months. When you’re ready to enjoy it, thaw it in the fridge overnight for the best texture.
What should I do if my mousse doesn’t set properly?
If your chocolate mousse doesn’t set, it could be due to not incorporating the gelatin correctly or adding the cream too soon. Ensure the mousse mixture is at room temperature before gently folding in the whipped cream. If it remains soft, refrigerate it for a little longer; it typically needs 1-2 hours to set fully.
Are there any allergen concerns I should be aware of with the Easter Nest Cake?
Yes! The Easter Nest Cake contains gluten, dairy, and eggs, making it unsuitable for people with gluten sensitivity, lactose intolerance, or egg allergies. You can use gluten-free flour and dairy substitutes to create an alternative cake, but be cautious about your ingredients if preparing for guests with allergens.
Decadent Easter Nest Cake: A Chocolate Masterpiece for Spring
Ingredients
Equipment
Method
- Preheat your oven to 350°F (175°C), cream the butter and sugar for 5-7 minutes, then add eggs one at a time.
- In a separate bowl, whisk together dry ingredients, then gradually mix into creamed butter and sugar.
- Pour batter into the springform pan and bake for 15-20 minutes; let cool for 10 minutes.
- Melt semisweet chocolate and create a chocolate band, refrigerate until firm.
- Drizzle remaining chocolate to create twigs, refrigerate until set, then break into shapes.
- Prepare the mousse by mixing sugar and cornstarch with milk, then add to whisked egg yolks.
- Dissolve gelatin in water, stir into thickened chocolate mixture, then cool.
- Whip cream to soft peaks, fold into chocolate mixture, and spoon over cake.
- After mousse sets, remove wax paper, decorate with twigs and M&M's, and dust with cocoa.
Leave a Reply