
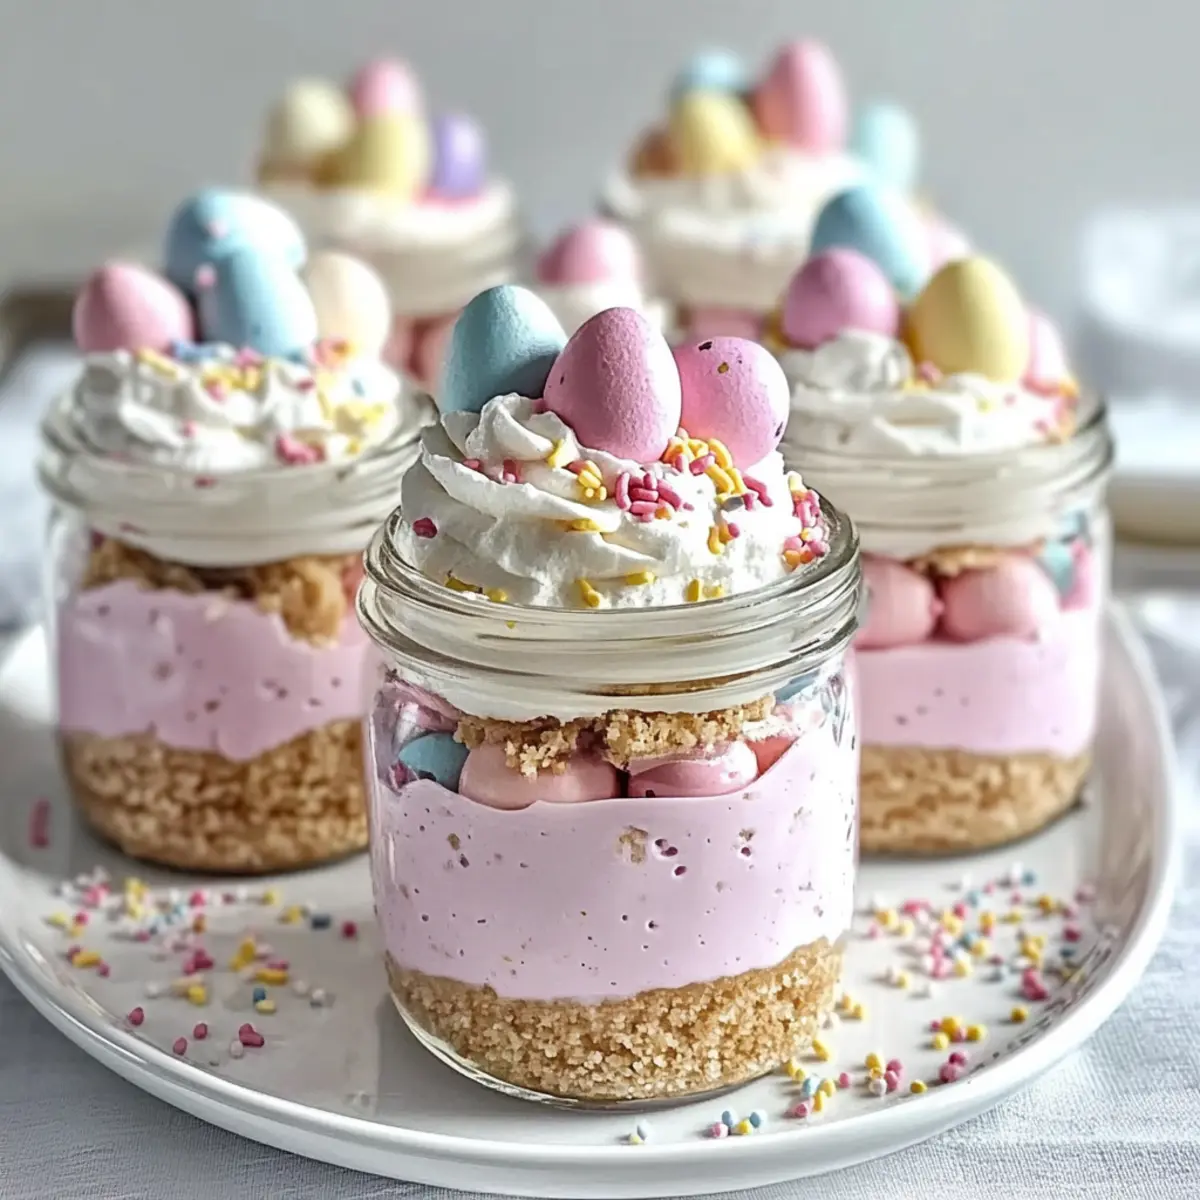
As I gazed across the vibrant spread of spring colors on my kitchen table, a thought struck me: dessert doesn’t have to be complicated to impress! Enter my Easter Egg Cheesecake Jars—a no-bake delight that’s as easy to prepare as it is to customize. Perfect for any spring celebration, these charming jars boast a creamy, pastel-colored filling nestled in a buttery graham cracker crust. The best part? You can whip them up ahead of time, freeing you to enjoy the festivities without a hitch. With a touch of personalization, you can create a unique dessert that’s not only a showstopper but also a crowd-pleaser. Curious about how to make these delightful treats your own? Let’s dive into the recipe!
Why Love These Easter Egg Cheesecake Jars?
Simplicity: No-bake means you can whip these up quickly, letting your creativity shine without the stress!
Customization: Personalize with colors and flavors to match your celebration’s theme or your family’s favorites.
Crowd-Pleaser: Deliciously rich yet light, they will impress both kids and adults at any spring gathering.
Make-Ahead: Prepare a day in advance, so you can spend more time enjoying the festivities and less time in the kitchen.
Festive Appeal: Their vibrant colors and whimsical toppings make these jars a stunning centerpiece for your table.
Think these look fun? You can also explore different flavors with options like Banana Pudding Cheesecake or try a rich twist with Chocolate Raspberry Cheesecake!
Easter Egg Cheesecake Jars Ingredients
These delightful Easter Egg Cheesecake Jars come together with simple, easy-to-find ingredients!
For the Crust
- Graham Cracker Crumbs – The essential base of the crust; for a twist, swap with crushed Oreos or shortbread cookies.
- Granulated Sugar – Adds sweetness to the crust; if you prefer, experiment with sugar alternatives.
- Unsalted Butter (melted) – Binds the crust together; make sure it’s fully melted for the best texture.
For the Cheesecake Filling
- Cream Cheese (softened) – Creates a rich, creamy texture; ensure it’s at room temperature for easy blending.
- Powdered Sugar – Sweetens the filling; you can use brown sugar for a more caramel-like flavor.
- Vanilla Extract – Enhances the overall flavor; opt for pure vanilla for deeper richness.
- Heavy Cream – Provides lightness and volume; substitute with coconut cream for a dairy-free version.
- Pink Gel Food Coloring or Freeze-Dried Strawberry Powder (optional) – Adds a lovely pastel hue to half of the cheesecake; try natural powders for an organic touch.
For the Toppings
- Whipped Cream – A fluffy topping for decoration; homemade whipped cream is a delightful choice.
- Pastel Candy Eggs – Cute, festive decorations that bring joy to the jars; feel free to use any small candy as a substitute.
- Rainbow or Pastel Sprinkles – Decorative flair that adds a fun touch; you can omit for a simpler look.
Dive into preparing these charming Easter Egg Cheesecake Jars and watch them become a beloved addition to your spring celebrations!
Step‑by‑Step Instructions for Easter Egg Cheesecake Jars
Step 1: Prepare the Crust
In a medium bowl, combine graham cracker crumbs, granulated sugar, and melted unsalted butter. Mix thoroughly until the mixture resembles damp sand. Evenly distribute the crust mixture into the bottom of your jars or glasses, using the back of a spoon to firmly press it down. This forms a sturdy base for your Easter Egg Cheesecake Jars.
Step 2: Beat the Cream Cheese
In a large mixing bowl, beat the softened cream cheese with an electric mixer on medium speed until smooth and creamy, about 2-3 minutes. Gradually add powdered sugar and vanilla extract, continuing to mix until the filling is light and airy. This fluffy mixture will be the heart of your Easter Egg Cheesecake Jars, so ensure it’s well-blended.
Step 3: Whip the Heavy Cream
In a separate chilled bowl, whip the heavy cream on high speed until stiff peaks form, which typically takes about 3-4 minutes. You want it to be thick yet still creamy, resembling whipped topping. Gently fold the whipped cream into the cream cheese mixture in two parts, ensuring you preserve the lightness to create a decadent texture for your cheesecake.
Step 4: Divide and Color the Mixture
Now, divide the creamy filling into two bowls. In one bowl, add pink gel food coloring or optional freeze-dried strawberry powder, stirring until evenly colored. This will give one layer of your Easter Egg Cheesecake Jars a delightful pastel hue. Leaving the other bowl plain allows for a beautiful contrast when layering.
Step 5: Layer the Cheesecake Mixtures
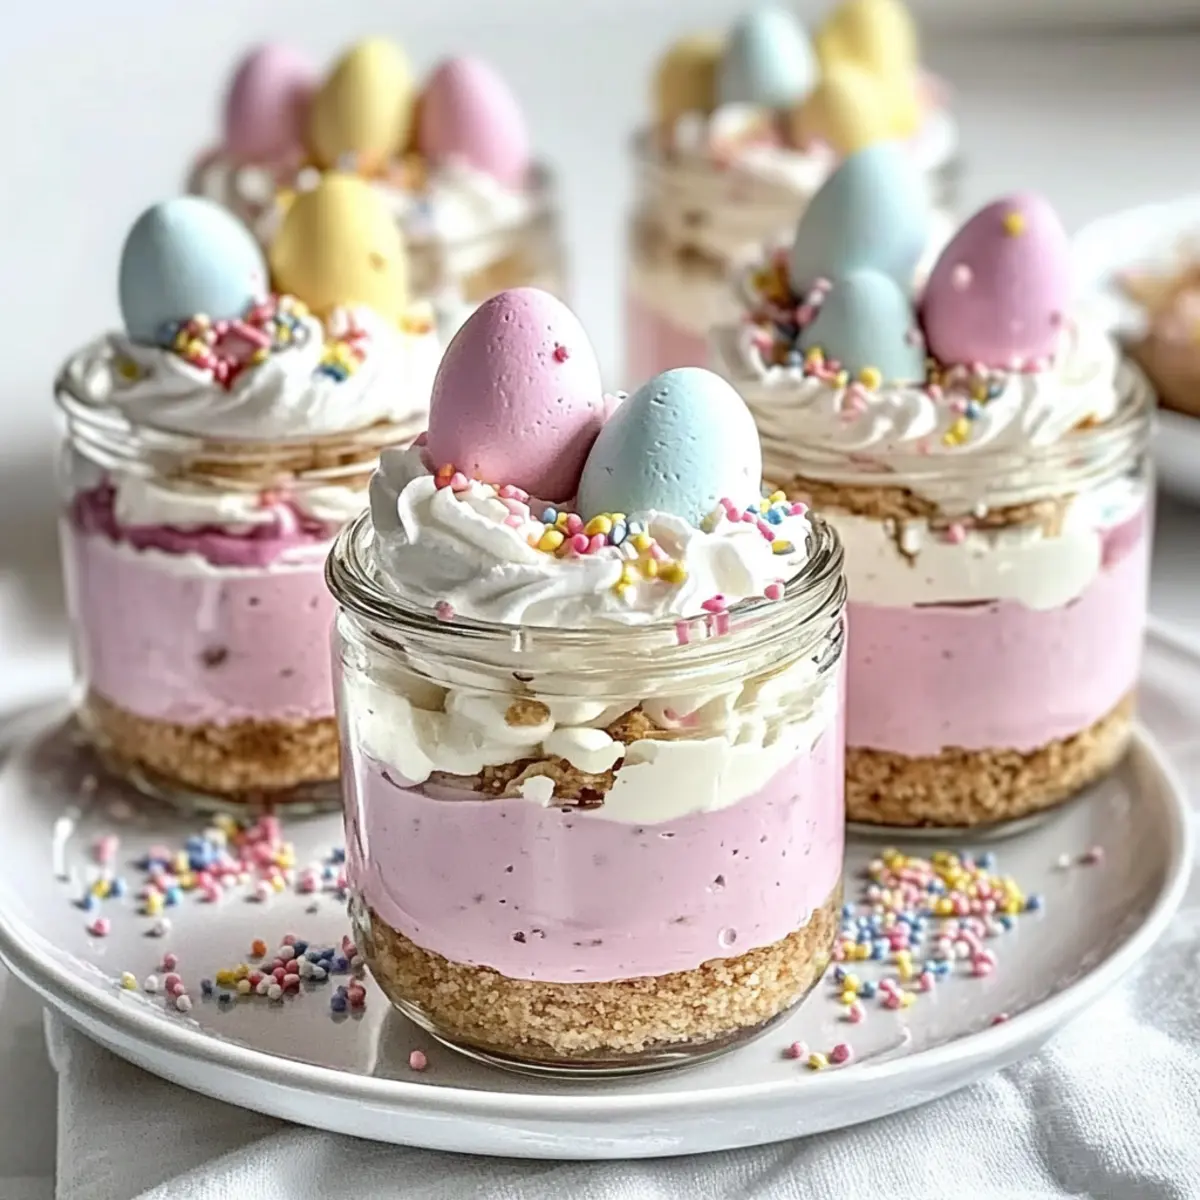
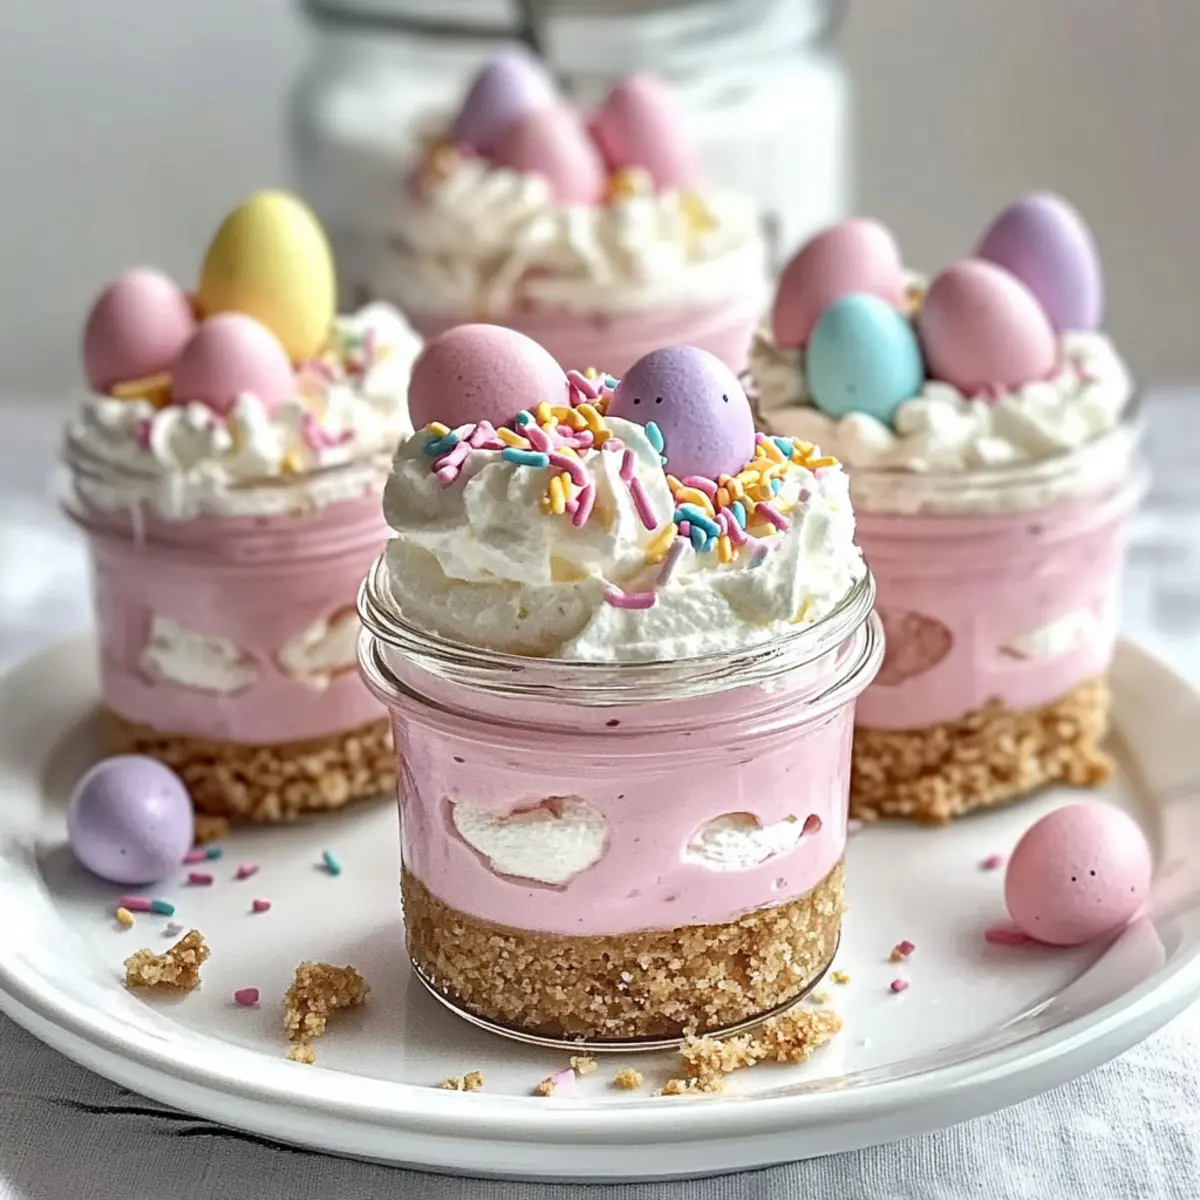
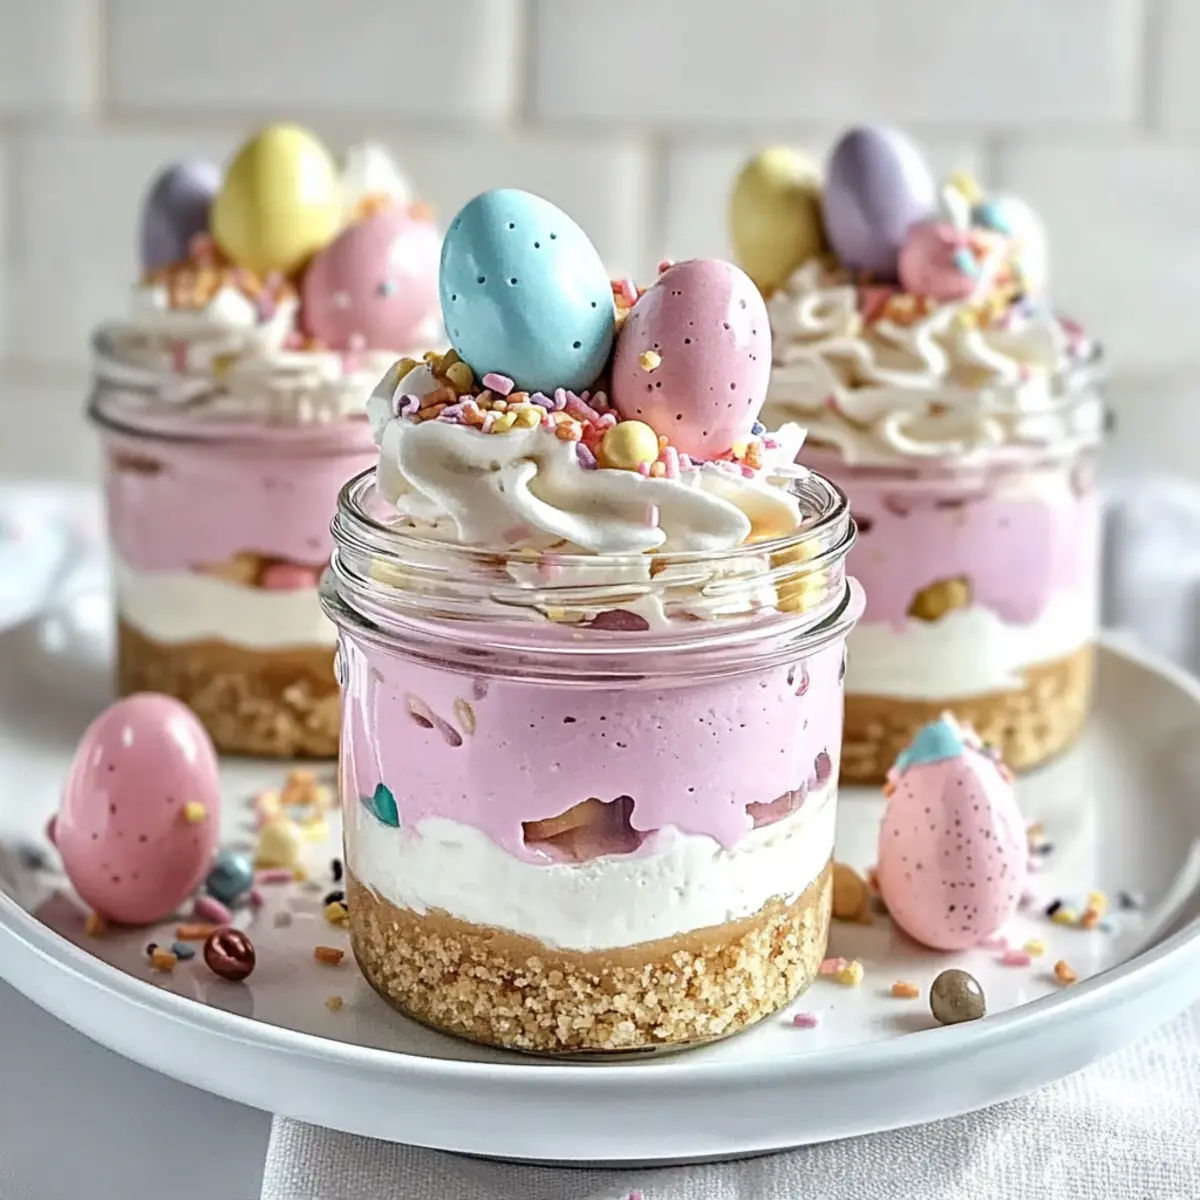
Using a piping bag or spoon, carefully layer the pink cheesecake mixture over the prepared crust first, filling each jar about halfway. Follow with a layer of the plain cheesecake mixture, gently smoothing the top. The vibrant colors will create a stunning visual appeal in your Easter Egg Cheesecake Jars, so take your time with this step for a beautiful presentation.
Step 6: Add Whipped Cream and Garnishes
Before serving, pipe a generous swirl of homemade whipped cream on top of each jar for a fluffy finish. Then, artfully decorate with pastel candy eggs and rainbow sprinkles, giving each cheesecake jar a festive touch. These garnishes not only enhance the aesthetic but also invite that playful spirit of spring into your presentation.
Step 7: Chill Before Serving
To ensure that your Easter Egg Cheesecake Jars are perfectly set and retain their shape, chill them in the refrigerator for at least 2 hours. This cooling time allows the flavors to meld beautifully and aids in firming up the layers for an attractive final look. Once chilled, they’ll be all set for your spring celebrations!
Easter Egg Cheesecake Jars: Variations & Substitutions
Feel free to inject your personality into these delightful jars, making them truly your own with these fun and creative twists!
- Flavor Infusion: Add a splash of lemon or almond extract to the filling for a refreshing flavor boost.
- Dairy-Free: Swap the cream cheese and heavy cream for dairy-free alternatives like cashew cream or silken tofu to cater to vegan friends.
- Crust Experiment: Replace graham cracker crumbs with crushed pretzels for a sweet-salty crunch that delights the palate.
- Colorful Creations: Instead of pink, use blue or green food coloring to mimic a spring theme or holiday palette. A dash of creativity goes a long way!
- Fruit Layer: Layer in a thin slice of fresh fruit, like strawberries or blueberries, between the cheesecake layers for added texture and flavor.
- Spicy Kick: Add a sprinkle of cinnamon or nutmeg into the filling for a warm, aromatic surprise in every bite.
- Chocolate Lovers: Incorporate cocoa powder into one layer for a chocolate-flavored cheesecake alternative. Perfect for chocolate enthusiasts!
- Nutty Crunch: Sprinkle crushed nuts or granola on top as a delightful finishing touch for both crunch and flavor!
Looking for more delicious inspiration? You may enjoy these lovely variations in the world of cheesecake like the indulgent Banana Pudding Cheesecake or the luscious Hogwarts Houses Cheesecake.
Make Ahead Options
These delightful Easter Egg Cheesecake Jars are perfect for meal prep enthusiasts! You can prepare the crust and cheesecake filling up to 24 hours in advance, allowing you to save time on busy days. Simply mix the graham cracker crumbs, sugar, and butter, then layer them into jars. Next, whip up the filling and layer it over the crust. To maintain the quality, cover the jars tightly with plastic wrap and refrigerate. When you’re ready to serve, simply pipe the whipped cream on top and add the delightful pastel candy eggs and sprinkles just before presenting them to your guests. This method not only ensures freshness but also keeps your spring celebrations stress-free!
What to Serve with Easter Egg Cheesecake Jars
These vibrant jars are a delightful centerpiece and pair beautifully with various dishes to create a memorable spring gathering.
- Fresh Berry Salad: A light medley of strawberries, blueberries, and raspberries complements the creamy cheesecake while adding brightness and tartness.
- Lemonade Sparkler: A refreshing sparkling lemonade adds a citrusy zing, perfectly balancing the sweetness of the cheesecake. Consider mint leaves for an aromatic touch!
- Grilled Chicken Salad: This light dish brings a savory contrast to the sweetness of the cheesecakes, adding texture and depth to your meal. Top with slivers of almonds for extra crunch.
- Carrot Cake Muffins: Enhance the spring vibe with these soft, spiced muffins. The mild flavors pair nicely with the cheesecake jars while keeping the Easter theme alive.
- Chocolate Dipped Strawberries: Simple yet elegant, these treats offer an indulgent chocolatey contrast to the light and creamy jars. They’re easy to enjoy and add a glamorous touch!
- Coconut Macaroons: These chewy morsels are a delightful addition, bringing a taste of the tropics while maintaining the festive spirit of spring.
- Iced Tea With Fresh Herbs: Add a refreshing twist to your beverage repertoire with herb-infused iced tea. It’s a lovely palate cleanser that enhances any spring table.
- Mini Fruit Tarts: For an extra touch of elegance, serve these alongside the cheesecake jars. Their crisp crust and fresh fruit toppings present a delightful bite that harmonizes beautifully with creamy desserts.
- Pineapple Upside-Down Cake: This classic dessert brings a nostalgic taste to your celebration, offering a sweeter flavor profile alongside the cheesecake.
These pairings elevate your feast and will surely impress family and friends with their delightful contrast and harmonious flavors!
Expert Tips for Easter Egg Cheesecake Jars
-
Chill Time Matters: Allow your jars to chill for at least 2 hours. This helps the cheesecake firm up and maintain its beautiful layers when served.
-
Perfect Cream Cheese: Make sure your cream cheese is fully softened. Cold cream cheese can lead to lumps in the filling, affecting the smoothness of your Easter Egg Cheesecake Jars.
-
Layering Technique: Use a piping bag for layering to create a clean, professional look. Take your time and be gentle to keep the colors distinct and pretty.
-
Flavor Enhancements: Feel free to experiment! Adding lemon zest to the white layer can give your cheesecake a zesty twist that complements its richness beautifully.
-
Customization Options: Don’t hesitate to use different crust types or coloring. You can substitute graham crackers with Oreos or adjust colors to match your spring celebration theme!
How to Store and Freeze Easter Egg Cheesecake Jars
Fridge: Store the jars in an airtight container for up to 3 days in the refrigerator. This keeps them fresh while preserving their delightful flavors and textures.
Freezer: If you want to make these Easter Egg Cheesecake Jars in advance, they can be frozen for up to 1 month. Just be sure to omit whipped cream and toppings before freezing; add them after thawing.
Thawing: When ready to enjoy, transfer the jars to the fridge for several hours or overnight to thaw gently. This ensures the cheesecake maintains its creamy consistency.
Serving Freshness: Always add whipped cream and decorations just before serving for that fresh, fluffy appeal. Enjoy these delightful treats at your spring celebrations!
Easter Egg Cheesecake Jars Recipe FAQs
How do I choose ripe ingredients for this recipe?
Absolutely! When selecting cream cheese, opt for a brand that feels smooth and spreadable, and ensure it’s at room temperature for easier mixing. For heavy cream, look for a product with a high fat content (around 36%) for the best whipping results. For graham cracker crumbs, avoid those with dark spots or a stale texture; fresh crumbs will help form a sturdy crust.
How should I store leftover Easter Egg Cheesecake Jars?
Great question! You can store the jars in an airtight container in the refrigerator for up to 3 days. This keeps the flavors fresh and maintains the lovely texture. If you have added whipped cream, make sure to cover it lightly to prevent it from getting soggy.
Can I freeze Easter Egg Cheesecake Jars?
Yes, you can! To freeze the jars, first remove any whipped cream and toppings. Cover tightly with plastic wrap or transfer to an airtight container and freeze for up to 1 month. When you’re ready to enjoy, thaw them in the refrigerator for several hours or overnight for the best results. Enjoy them fresh for that delightful taste!
What should I do if my cheesecake mixture appears lumpy?
If your cheesecake mixture has lumps, don’t fret! The primary reason is usually that the cream cheese wasn’t softened enough. To fix it, consider passing the mixture through a fine-mesh sieve to smooth it out. If you have an electric mixer, beat the mixture thoroughly until fully blended, which will help to break down any lumps and create that silky texture.
Are there any dietary considerations to take into account?
Very good point! If preparing for guests with dietary restrictions, consider offering a dairy-free option by substituting cream cheese and heavy cream with vegan alternatives like cashew cream or coconut cream. Be mindful of any allergies to gluten as well; using gluten-free graham crackers can ensure everyone enjoys these Easter Egg Cheesecake Jars.
Delightful Easter Egg Cheesecake Jars for Easy Spring Treats
Ingredients
Equipment
Method
- In a medium bowl, combine graham cracker crumbs, granulated sugar, and melted unsalted butter. Mix until resembling damp sand. Press evenly into jars.
- In a large bowl, beat softened cream cheese until smooth. Gradually mix in powdered sugar and vanilla extract.
- In a separate bowl, whip heavy cream until stiff peaks form. Fold into cream cheese mixture in two parts.
- Divide filling into two bowls. Color one half with food coloring or powder.
- Layer pink cheesecake mixture over the crust followed by the plain cheesecake mixture in each jar.
- Pipe whipped cream on top and decorate with pastel candy eggs and sprinkles.
- Chill jars in the fridge for at least 2 hours before serving.
Leave a Reply