
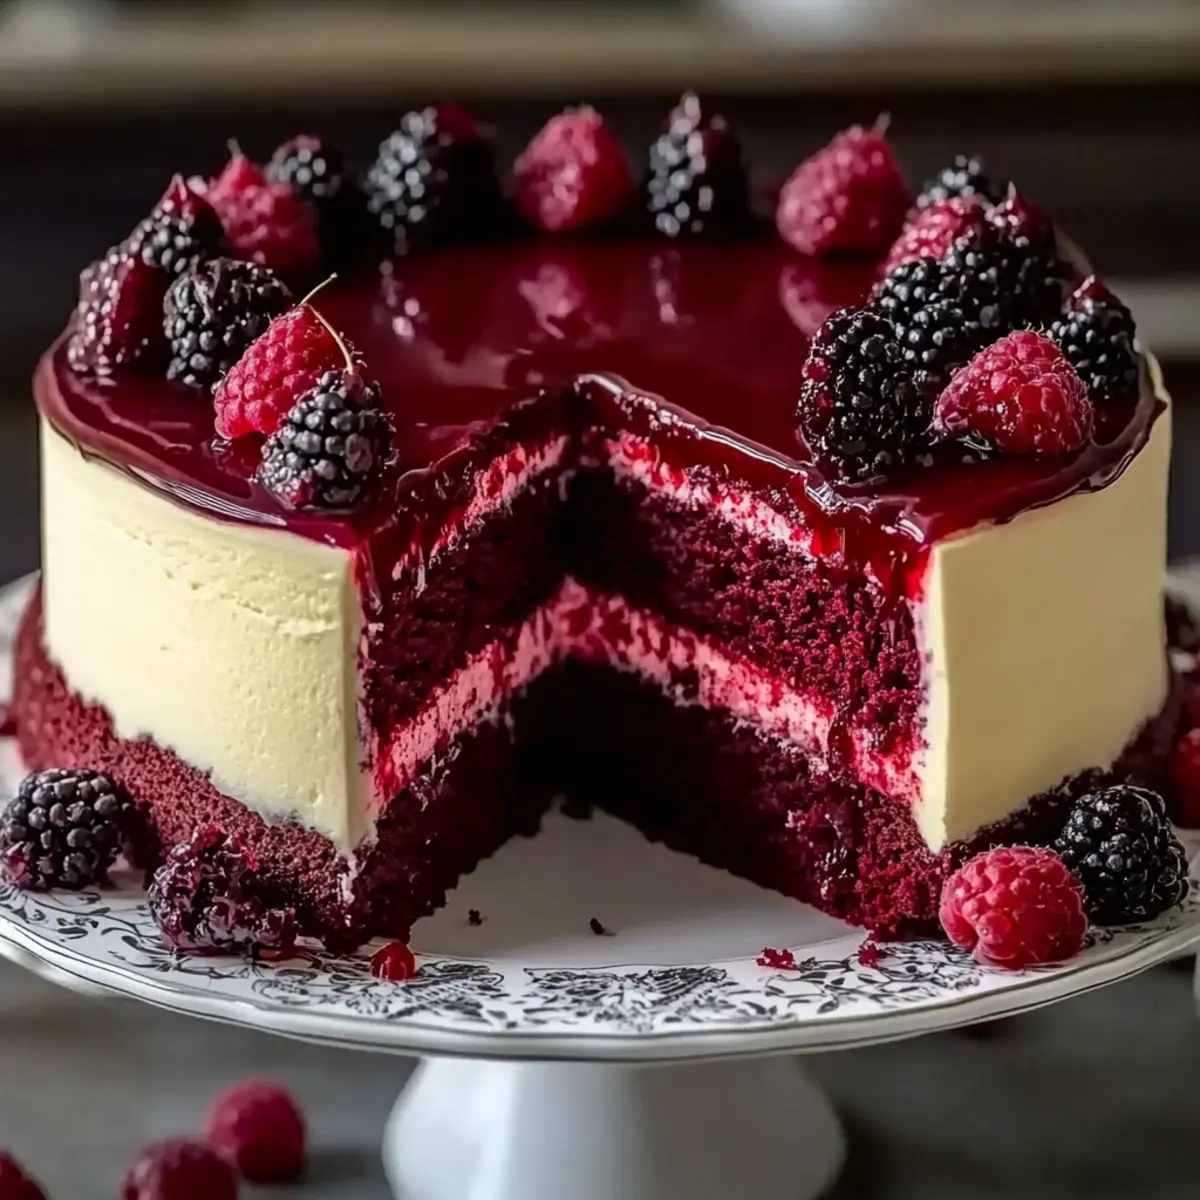
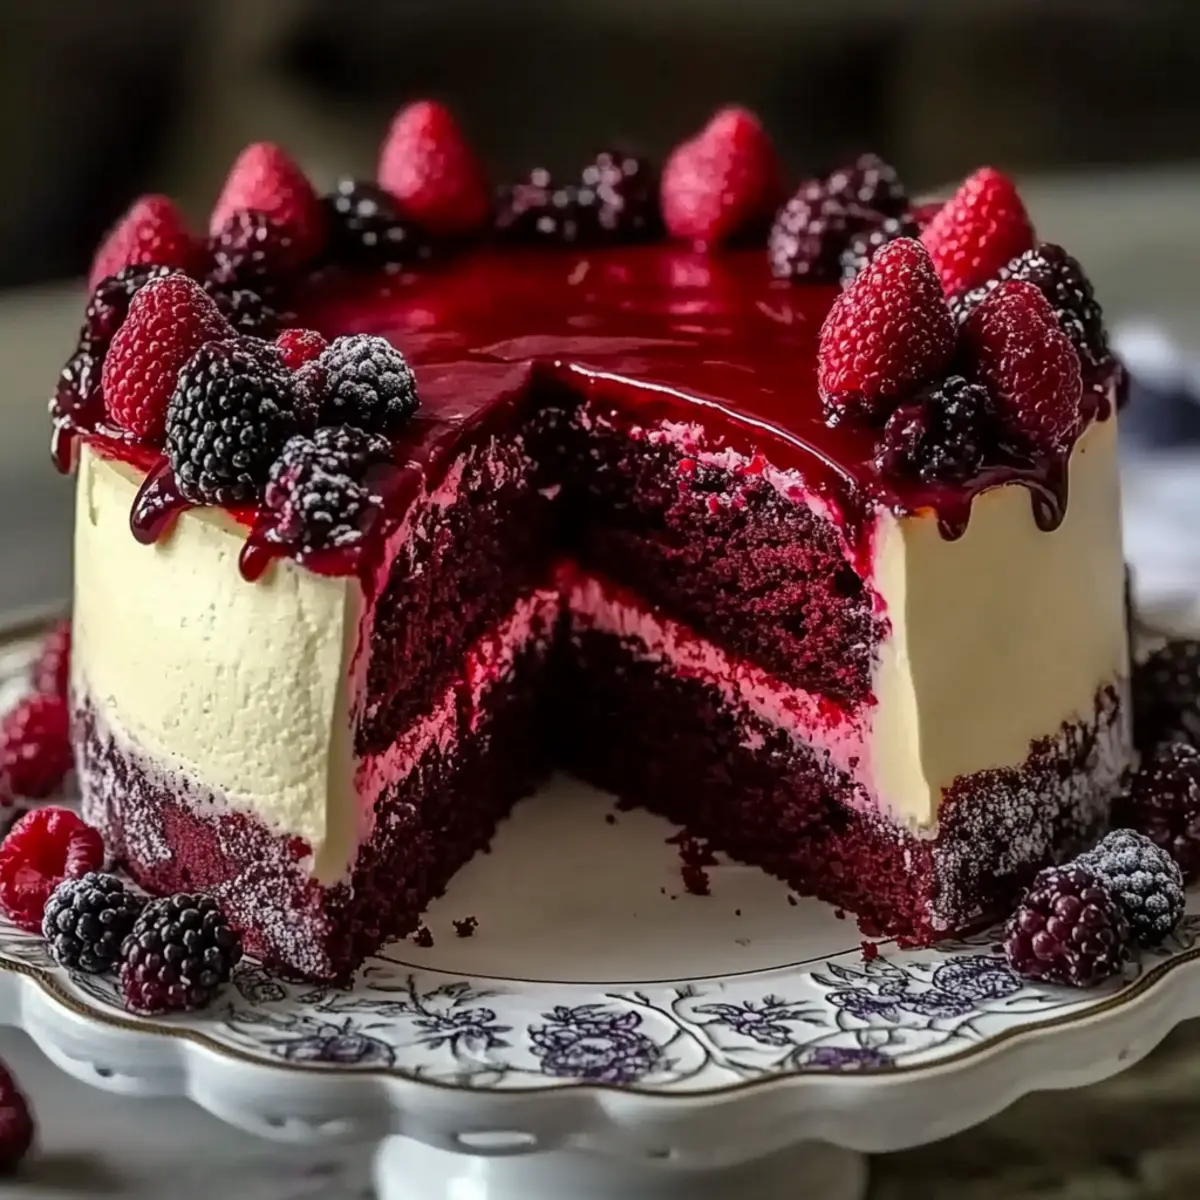
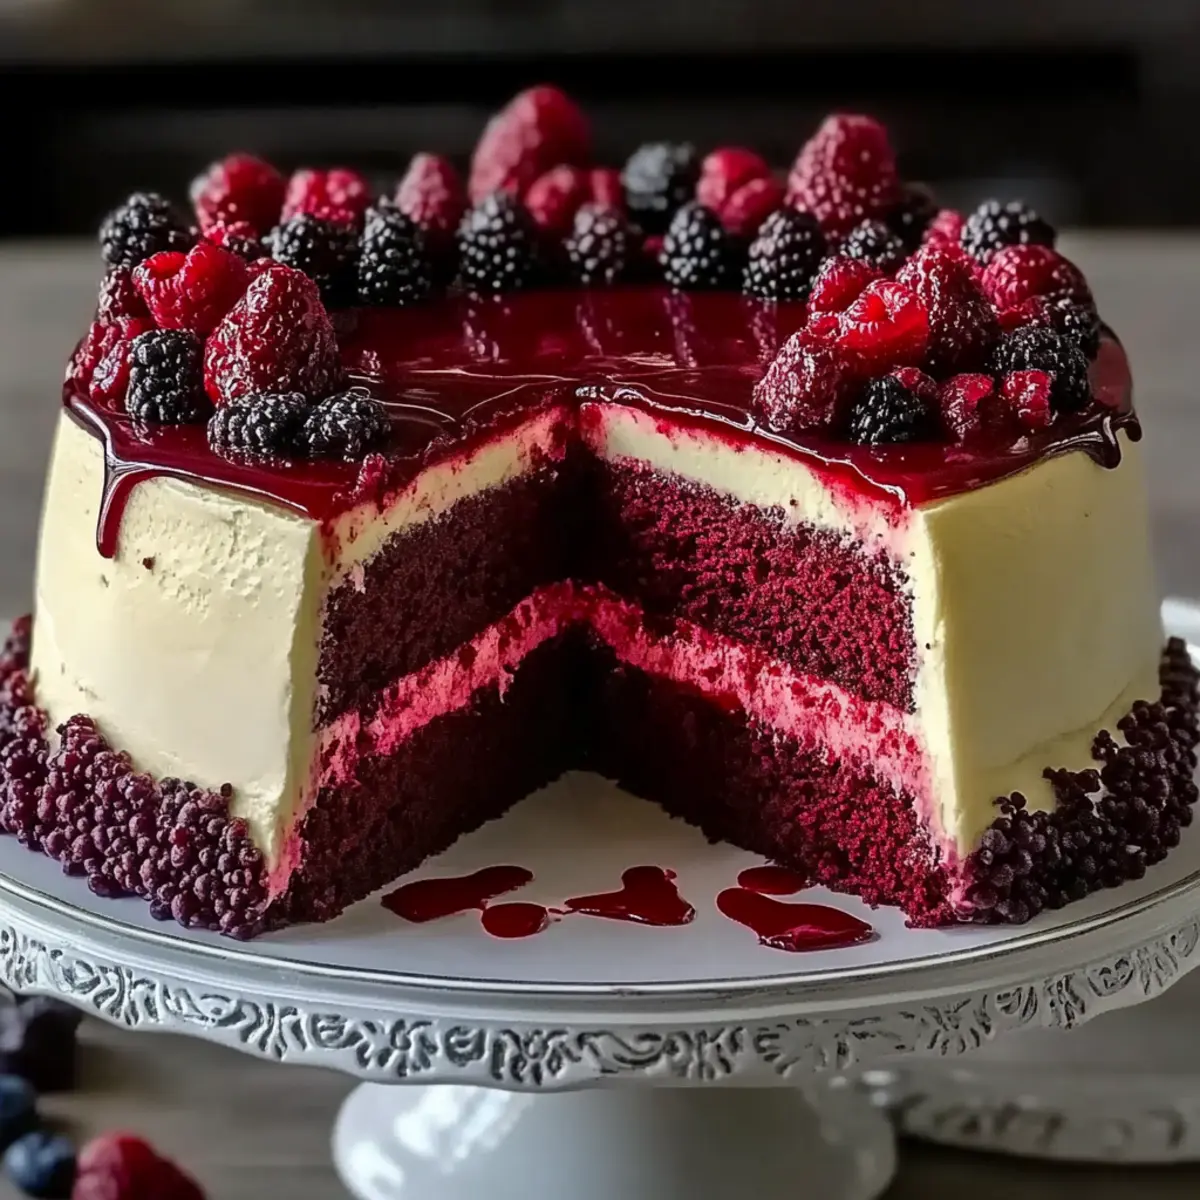
Just when I thought I had reached the pinnacle of dessert, I discovered the Red Velvet Cheesecake Layer Cake Recipe. A dreamy fusion of soft, velvety red velvet and rich, creamy cheesecake creates an unforgettable indulgence that’s sure to impress. Not only is this cake a showstopper for gatherings, but it’s also surprisingly simple to prepare, making it a delightful treat for any day! Plus, with the added bonus of a vibrant berry glaze, every slice is a feast for the eyes, as well as the taste buds. So, are you ready to take your dessert game to the next level and impress your loved ones with this exquisite cake?
Why is this cake a must-try?
Show-Stopping Appearance: This cake boasts a stunning, vibrant red color topped with a glossy berry glaze that makes it a real centerpiece at any gathering.
Irresistible Flavor Combination: The pairing of rich red velvet and creamy cheesecake is pure bliss, offering a unique twist on traditional dessert flavors.
Simple to Make: With straightforward steps, even novice bakers can confidently create this masterpiece from scratch.
Versatile Delight: Whether for a holiday feast, birthday celebration, or just a special treat, this Red Velvet Cheesecake Layer Cake is perfect for any occasion.
Crowd-Pleasing Favorite: Everyone loves a good cheesecake; add in the iconic red velvet, and you have a guaranteed hit!
Try pairing it with a scoop of vanilla ice cream or serve alongside coffee for a delightful indulgence. For more fun dessert ideas, check out my Banana Pudding Cheesecake or the festive Chocolate Skull Cake!
Red Velvet Cheesecake Layer Cake Ingredients
For the Crust
- Chocolate Cookie Crumbs – Essential for creating a decadent base; swap with graham cracker crumbs if you prefer a different flavor.
- Butter – Binds the crumbs together; using unsalted butter gives you more control over the sweetness.
For the Cake
- All-Purpose Flour – Provides the cake’s structure; feel free to substitute with a gluten-free flour blend for a dietary modification.
- Cocoa Powder – Adds that rich chocolate flavor; go for unsweetened cocoa powder for the best results.
- Baking Soda – Helps the cake rise for a light texture.
- Baking Powder – Works in tandem with baking soda for extra lift.
- Salt – Balances flavors and enhances sweetness.
- Granulated Sugar – Sweetens the cake and adds moisture; a sugar alternative can be used if you prefer.
- Vegetable Oil – Introduces moisture and richness; melted coconut oil is a fantastic replacement.
- Eggs – Essential for binding and providing moisture to the cake.
- Buttermilk – Gives a unique tang; if unavailable, mix milk with vinegar or use yogurt instead.
- Vinegar – Vital for enhancing the cake’s color and tenderness.
- Vanilla Extract – A must-have flavor enhancer.
- Red Gel Food Coloring – Delivers that iconic deep red hue, avoiding liquid coloring for best results.
For the Cheesecake Layer
- Cream Cheese – The rich, creamy filling that makes this cheesecake irresistible.
- Sour Cream – Adds creaminess and a zesty tang; substitute with heavy cream if desired.
- Powdered Sugar – Provides the frosting sweetness; feel free to use less if you want it less sweet.
For the Berry Glaze
- Fruit Jam (Strawberry/Raspberry) – Adds a lovely sweetness and brightness to the topping; adjust based on your sweetness preference.
- Fresh Berries (optional) – Excellent for decoration and a burst of freshness!
With these ingredients in hand, you’re all set to create the stunning Red Velvet Cheesecake Layer Cake Recipe that will wow your friends and family!
Step‑by‑Step Instructions for Red Velvet Cheesecake Layer Cake Recipe
Step 1: Prepare the Crust
In a mixing bowl, combine chocolate cookie crumbs with melted unsalted butter until crumbly. Press this mixture firmly into the bottom of a 9-inch springform pan to create an even crust. Bake at 350°F (175°C) for 10 minutes, then remove and let it cool completely while you prepare the cake layers.
Step 2: Bake Red Velvet Layers
Preheat your oven to 350°F (175°C). In one bowl, whisk together all-purpose flour, cocoa powder, baking soda, baking powder, and salt. In a separate bowl, mix granulated sugar, vegetable oil, eggs, buttermilk, vinegar, vanilla extract, and red gel food coloring until smooth. Gently combine wet and dry ingredients, then divide the batter between two greased 9-inch round cake pans. Bake for 25-30 minutes or until a toothpick inserted into the center comes out clean. Allow the cakes to cool completely.
Step 3: Make the Cheesecake Layer
In a large mixing bowl, beat softened cream cheese and powdered sugar together until smooth and creamy. Add eggs one at a time, mixing well after each addition, then blend in sour cream and vanilla extract. Pour this cheesecake mixture over the cooled crust or into a separate lined pan. Bake at 325°F (160°C) for 40-45 minutes, until the center jiggles slightly. Once baked, cool and refrigerate the cheesecake for several hours or until set.
Step 4: Assemble the Cake
Once your red velvet layers and cheesecake have cooled completely, place one red velvet layer on a serving plate. Spread an even layer of cream cheese frosting over the top, then carefully add the cheesecake layer. Top with the second red velvet layer, continuing to frost the sides and the top of the cake with remaining cream cheese frosting. Smooth it out for a polished finish.
Step 5: Finish with Berry Glaze
To prepare the berry glaze, warm your chosen fruit jam in a small saucepan, adding a splash of water and a squeeze of lemon juice to thin it out. Drizzle the warm glaze over the top of your frosted cake, allowing it to run slightly down the sides. If desired, decorate with fresh berries or additional frosting swirls for an elegant touch.
Red Velvet Cheesecake Layer Cake Variations
Feel free to get creative with your cake! Here are some delightful twists to customize your dessert experience.
-
Graham Cracker Crust: Swap out chocolate cookie crumbs for graham cracker crumbs to bring a hint of sweetness and a different texture.
-
Gluten-Free Adjustments: Replace all-purpose flour with a gluten-free flour blend to make this cake suitable for gluten-sensitive friends without sacrificing taste.
-
Mini Cakes: For an adorable twist, make individual mini red velvet cheesecakes in jars. Layer the cheesecake filling with crumbled red velvet cake for an eye-catching dessert.
-
Chocolate Ganache Glaze: For chocolate lovers, trade the berry glaze for a rich chocolate ganache that will envelop the cake in divine decadence.
-
Nutty Crust: Add a handful of crushed pecans or walnuts to the crust for a delightful crunch—perfect for a textured contrast with the smooth cheesecake layer.
-
Berry Swirl: Incorporate a fruit puree into the cheesecake batter for a marbled effect. Raspberry or strawberry complements the tangy cheese and adds a pop of flavor.
-
Spiced Version: Add a dash of cinnamon or nutmeg to the cake batter for a warm, spiced flavor that adds an intriguing twist to your dessert.
-
Festive Sprinkles: For birthdays or celebrations, dress the cake with colorful sprinkles or edible glitter on top of the frosting and glaze for a joyful flair!
By exploring these variations, you can create a unique dessert each time or surprise your friends and family with diverse flavors. If you’re looking for more delicious dessert ideas, check out my Chocolate Raspberry Cheesecake or treat yourself to my Velvet Strawberry Cheesecake!
Expert Tips for Red Velvet Cheesecake Layer Cake
-
Use Softened Cream Cheese: Ensure your cream cheese is softened to room temperature for smooth mixing, preventing lumps in your cheesecake layer.
-
Don’t Overmix Batter: Mix the cake batter just until combined. Overmixing can lead to a dense texture in your red velvet cheesecake layer cake.
-
Cool Completely: Allow both the cake layers and cheesecake to cool completely before assembling. This helps prevent melting and ensures a sturdy cake.
-
Check Cheesecake Doneness: The cheesecake should jiggle slightly in the center when done, indicating it will firm up while cooling, so don’t overbake.
-
Glaze Timing: Drizzle the berry glaze over the frosting just before serving for a glossy finish and to maintain its vibrant color.
-
Storage Tips: Store any leftovers in the refrigerator in an airtight container for up to 5 days to keep the flavors fresh and vibrant.
What to Serve with Decadent Red Velvet Cheesecake Layer Cake?
Indulge in a delightful meal experience with perfect pairings that elevate your dessert to new heights.
-
Classic Vanilla Ice Cream: The creamy richness complements the cake’s tanginess, creating a balanced and satisfying bite with each forkful.
-
Fresh Berry Salad: A medley of seasonal berries brings a refreshing touch, cutting through the cake’s richness and enhancing the berry glaze.
-
Coffee or Espresso: A cup of coffee or a shot of espresso enhances the cake’s flavors, bringing out the chocolate undertones in a warm embrace.
-
Sweet Wine: Consider serving a sweet dessert wine, like Moscato or Port, which beautifully enhances the dessert’s flavors without overpowering them.
-
Chocolate Ganache: Drizzling warm chocolate ganache on top adds an indulgent twist, intensifying the dessert’s luxurious feel with its rich flavor.
-
Whipped Cream Topping: Light and airy whipped cream adds a soft texture contrast to the dense cheesecake layers, making every bite delightful.
-
Coconut Macaroons: These chewy cookies provide a unique flavor contrast, echoing the creaminess of the cake while enhancing the treat’s festivity.
Each pairing invites you to savor the delicious journey of the Red Velvet Cheesecake Layer Cake recipe, ensuring every occasion is sweetly memorable.
Make Ahead Options
These Red Velvet Cheesecake Layer Cakes are perfect for meal prep, saving you valuable time, especially for those bustling weeknights or upcoming gatherings! You can prepare the crust and cheesecake layer up to 48 hours in advance; simply bake and cool them before refrigerating. The red velvet cakes can be made up to 24 hours ahead as well, allowing the flavors to deepen. When you’re ready to assemble, layer the red velvet cakes with cream cheese frosting and top with the chilled cheesecake. Finish with the berry glaze right before serving to maintain that glossy finish. This method ensures your dessert is just as delicious and stunning while relieving some last-minute stress!
How to Store and Freeze Red Velvet Cheesecake Layer Cake
Fridge: Store your cake in an airtight container in the refrigerator for up to 5 days. This keeps it moist and ensures the flavors meld beautifully.
Freezer: For longer storage, wrap the cake tightly in plastic wrap and aluminum foil, and freeze for up to 3 months. Thaw in the fridge overnight before serving.
Reheating: If you prefer your cake slightly warmed, slice and microwave on low for about 15-20 seconds, ensuring it retains its creamy texture without overheating.
Slice First: Consider slicing the cake before freezing for convenience. This way, you can enjoy a slice whenever the craving for this red velvet cheesecake layer cake recipe strikes!
Red Velvet Cheesecake Layer Cake Recipe FAQs
How do I choose ripe ingredients for this recipe?
Absolutely! For the freshest results, select ripe fruit for the berry glaze—look for bright, plump berries without any dark spots or bruises. When it comes to the cream cheese, ensure it’s softened to room temperature, which helps achieve a smooth cheesecake layer.
How should I store leftover cake?
Very simple! Store your Red Velvet Cheesecake Layer Cake in an airtight container in the refrigerator for up to 5 days. Keeping it well-sealed maintains its moisture and flavor, making each slice just as delicious as the first!
Can I freeze the Red Velvet Cheesecake Layer Cake?
Absolutely, you can! To freeze, wrap the entire cake tightly in plastic wrap and aluminum foil. This will keep it fresh for up to 3 months. For convenience, you might consider slicing the cake before freezing. Thaw it overnight in the fridge before serving to enjoy the best flavor and texture.
What should I do if my cheesecake cracks during baking?
Don’t worry! A cracked cheesecake is a common issue. To avoid this, make sure not to overmix the batter, keep an eye on the baking time, and allow your cheesecake to cool gradually. If it does crack, you can cover it with frosting and berry glaze; no one will be the wiser!
Are there any dietary considerations I should keep in mind?
Certainly! If you or your guests have allergies, make sure to check for gluten and dairy in the ingredients. You can substitute gluten-free flour for the all-purpose flour and use dairy-free cream cheese for a lactose-free option. Always ask your guests about any food restrictions before serving.
How long does the cheesecake layer need to cool before serving?
It’s important! After baking, let the cheesecake layer cool in the pan for about 1 hour at room temperature. Then, transfer it to the refrigerator to chill for at least 4 hours or overnight. This ensures that it sets properly and will slice beautifully for your cake assembly!

Ultimate Red Velvet Cheesecake Layer Cake Recipe to Impress
Ingredients
Equipment
Method
- Prepare the crust by mixing chocolate cookie crumbs with melted butter and pressing into a 9-inch springform pan. Bake at 350°F (175°C) for 10 minutes, then cool.
- Bake the red velvet layers by preheating the oven. Mix dry ingredients in one bowl and wet ingredients in another. Combine and divide between two greased pans. Bake at 350°F (175°C) for 25-30 minutes.
- Make the cheesecake layer by beating cream cheese and sugar until smooth. Add eggs, sour cream, and vanilla. Pour over the cooled crust. Bake at 325°F (160°C) for 40-45 minutes.
- Assemble the cake by layering red velvet cakes with cream cheese frosting and the cheesecake layer.
- Finish with berry glaze by warming fruit jam and drizzling over the cake. Decorate with fresh berries if desired.
Leave a Reply